Fractions Day 5: Which are Equivalent?

Equivalence is everything when it comes to fractions. Kids who understand which fractions are the same size and how to create fractions that are the same size are the ones in math class that say, “It’s easy!”. It’s not easy; it makes sense to them. Since I am at home with my tiny human for A-WHILE, I decided we would spend a good grip of time on equivalence. The next 3 lessons (and many more after introducing the family of thirds in Lesson 8) will focus on understanding equivalence with fractions.

Finding Equivalent Fractions to 1/2.
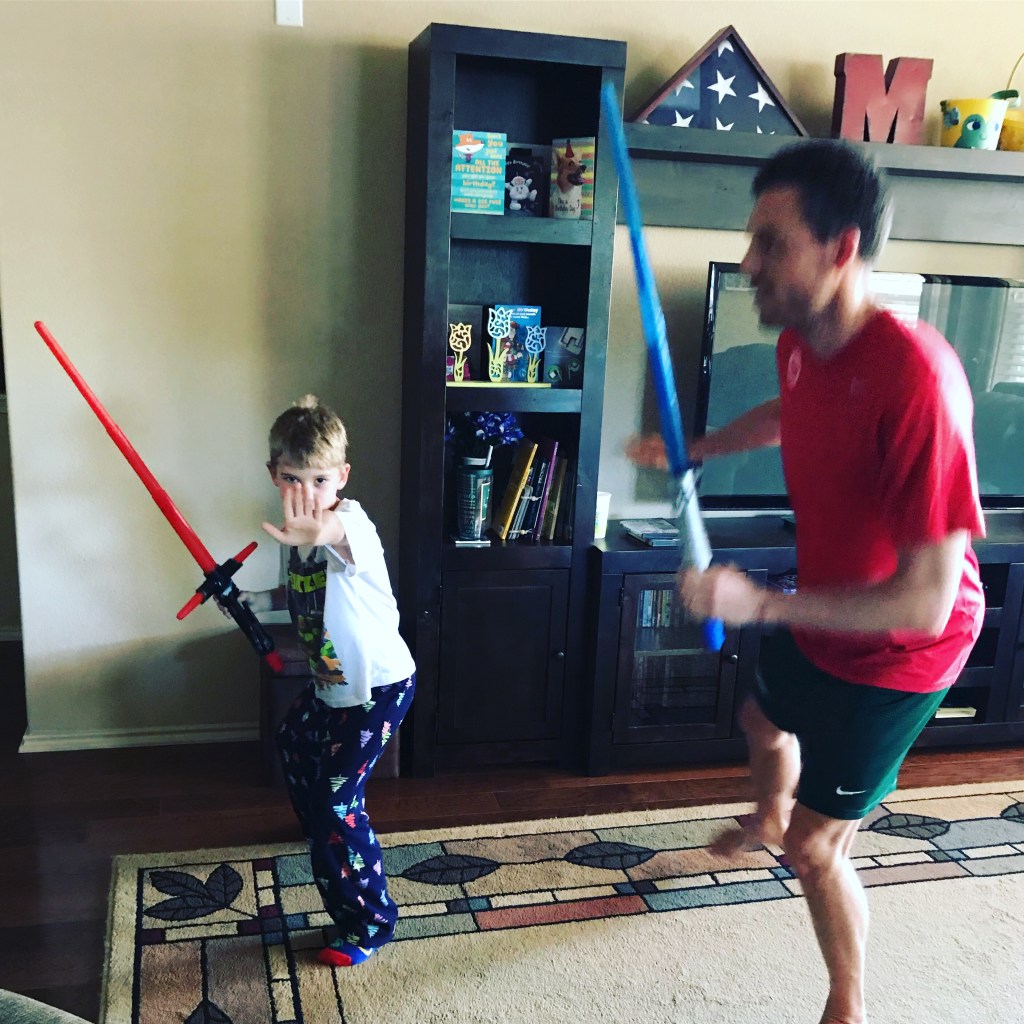
  1. Play “Cover it Up!” twice. Please see Fractions Day 2 for how to play the game. My questions to Chris focused on when our amounts were the same, or how to make them the same. How much more would I need to tie you? Which fraction would you need to have the same amount as me? I still had him write the addition sentence once he covered up the whole.
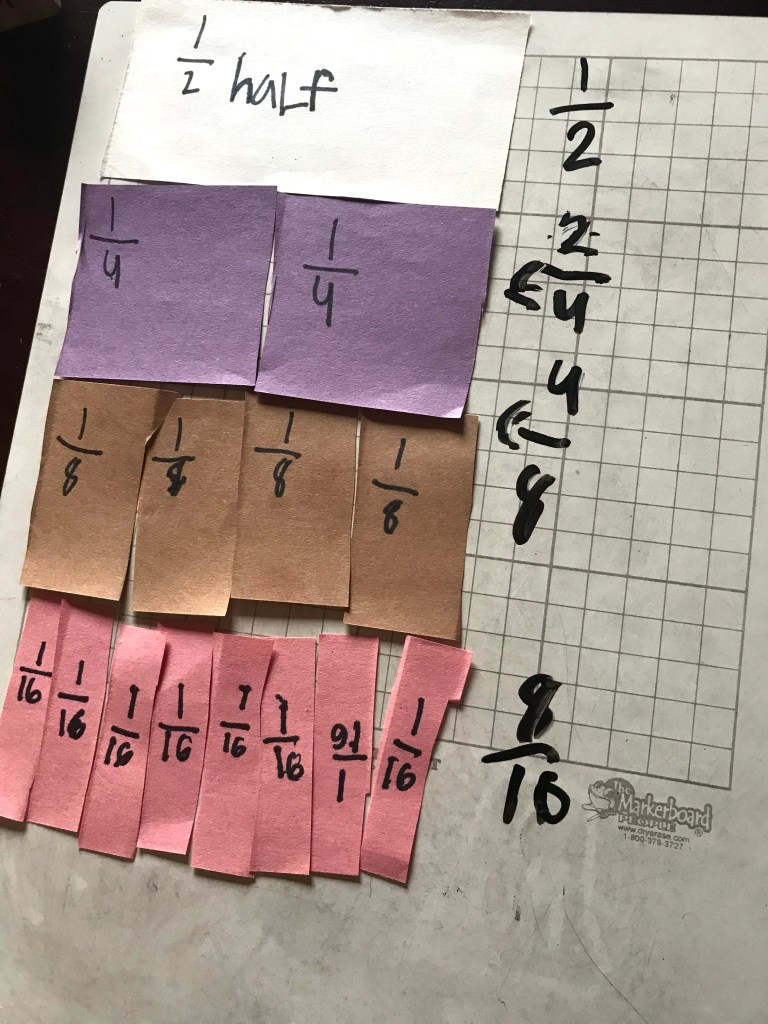
  2. I asked him to pull out one of his half pieces. How many eights would I need to cover up the half? (2). I then directed him to do the same with each fraction size. He had to cover up with only that size piece. We counted them out (One-eighth, two-eighths, three-eighths, 4-eighths…4/8 is the same as 1/2.) and wrote down each fraction amount that was equivalent to half. See image above for our work.
  3. On the whiteboard, I wrote 3/4. How many eighths would it take to cover 3/4? How many eighths are the same as 3/4?
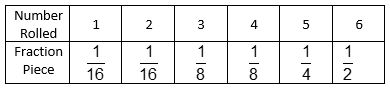
  4. We continued looking at different fractions and finding the equivalent amount. The fraction sequence is below (See Equivalent Fractions Practice doc.), but looking at it now I would suggest less sixteenths and more fourths and eighths. Will need to do that tomorrow.
  5. I let him create two of his own. This was not easy. He just kind of stared at me. (Soooo tough not to just tell him, but the struggle is good for him!) I rephrased: Choose a fraction and find another that is the same size. Though this limited him at first, it helped get the ball rolling. He chose 1=2/2 for his first one. Though not what I was looking for, it is true! He second was more interesting (Wish I had asked for 3!) He chose 2/1=4/2. I was shocked, because we haven’t even talked about anything over a whole. However, when concepts make sense to kids, they can naturally apply them to unique situations.
Finding an Equivalent Fraction to 3/8.

Hope you have a great day exploring new ideas and making fractions fun!

Fractions Day 5: Which are Equivalent?

Shut up! Dance it Out.

Today was tough. I don’t need to tell any of you all the feels, as I am sure you have them as well. But I just couldn’t get my teacher mojo going. I felt lost; I felt out of control; I just didn’t feel like myself.

I feel like these days are going to come more often than I would like. I am going to need to take my Type A-ness and shove it down, because I need to give myself grace and space. And my advice today is this: Give yourself grace and space. Hug your littles, play a game, act silly, laugh, and above all, Dance it Out! (Or do Star Wars moves…whatever works!)

Shut up! Dance it Out.

Fractions Day 4: Which is Smaller?

I am a fan of repurposing (NEW WoRd!!!) problems. I figure, if you can read a book for different purposes, why not math problems? Plus, it makes planning that much easier for you! And right now we have enough on our plates!

  1. Played “Cover it Up!” twice. Please see Fractions Day 2 post for how to play the game. The questions I used were focused on were:  Who has less? or Who is losing? How do you know? to front load for today’s lesson. NOTE: I still make him write the addition sentence at the end of each game to work on notation and such.
  2. Using a whiteboard (or scratch paper), I drew the equal symbol (=). What does this mean? Today Chris said they were equal, or the same. We moved on.
  3. Under that work, I drew the greater than symbol (>). What does this symbol mean? (The first number is bigger or greater than the second number.) Again, I had him choose two fraction pieces from the Fraction Kit to compare, with the first being bigger than the second. He actually did not choose the same ones as yesterday. We then wrote the number sentence that it represented.
  4. I drew the greater than symbol (<). What does this symbol mean? (The first number is smaller or less than the second number.) I had him choose two fraction pieces from the Fraction Kit to compare, with the first being smaller than the second. He actually did not choose the same ones as yesterday. My little Sassy Sam just reversed the ones he had. We wrote the inequality and moved on.
  5. I had Chris compare pairs of the unit frunit fraction compare
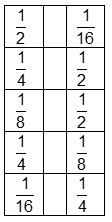
actions from the Fraction Kit and tell me which one was smaller and why.  They were the same ones I used yesterday. He didn’t notice!
  6. We moved on to the fractions with different numerators (still only using the denominators from the Fraction Kit). I gave him (one at a time) pairs of fractions to compare. He could use the Fraction Kit pieces to determine which was smaller, circling it on the whiteboard. I asked him to convince me why one fraction was smaller than the other, and he verbally explained or showed me with his fraction pieces. See below for the sequence of pairs we explored (The red fractions are the smaller fractions.)less
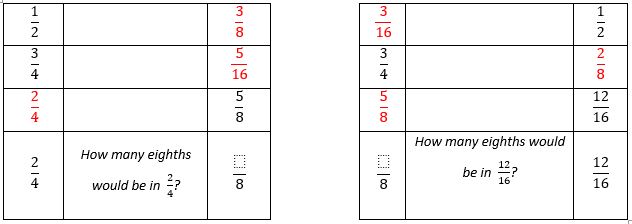
I often asked, How many ________ would you need to make them equal?, just to start the seed of equivalent fractions (Day 5). I threw at him two unit fractions (1/2 and 1/7) to see if he could apply his understanding without always using the Fraction Kit pieces.

Happy Comparing!

Fractions Day 4: Which is Smaller?

Fractions Day 3: Which is Bigger?

Science and a Birthday gift of slime/putty jars kept us busy and at a very quick math lesson today. ‘Cuz you know…priorities!

  1. Played “Cover it Up!” twice. Please see Fractions Day 2 post for how to play the game. The questions I used were focused on were:  Who had more? or Who is winning? How do you know? to front load for today’s lesson.
  2. Using a whiteboard (or scratch paper), I drew the equal symbol (=). What does this mean? (Chris said it meant they were the same size, which I was fine with.) Show me which pieces would be equal. He showed the 1 whole and 2/2. I then wrote 1=2/2.
  3. Under that work, I drew the greater than symbol (>). What does this symbol mean? (Chris said it was an alligator. More on that another blog. I am not in the mood for that one!) We discussed that it meant the first number you write must be bigger than the second number. The math vocab wasn’t very sophisticated, as I just want him understanding the idea. I had him choose two fraction pieces from the Fraction Kit to compare, with the first being bigger than the second. We then wrote the number sentence that it represented.
  4. I had Chris compare pairs of the unit frunit fraction compareactions from the Fraction Kit and tell me which one was greater and why.  See the unit fractions to the right for sequence of the pairs we explored.
  5. Once he had the idea of comparing we moved on to fractions with different numerators (still only using the denominators from the Fraction Kit). I gave him (one at a time) pairs of fractions to compare. He could use the Fraction Kit pieces to determine which was greater, circling it on the whiteboard. I asked him to convince me why one fraction was larger than the other, and he verbally explained or showed me with his fraction pieces. See below for the sequence of pairs we explored (The circled ones are the greater fractions.).comparing fractions
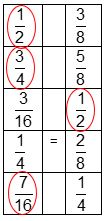
I often asked, How many more of ____ would you need to make them equal?, just to start the seed of equivalent fractions (Day 5). Then I threw a pair of equivalent fractions in our set to see what he would do. (He rolled his eyes and said they were equal. Duh, Mom!)


Overall, Chris did well with circling which fraction was bigger, so long as he could use the pieces to work through the pairs. This is appropriate, as he hasn’t learned any other strategies for comparing. We will move to which fraction is smaller tomorrow to continue comparing sizes of fractions and really understanding what the numerator and denominator mean with respect to the Fraction Kit pieces.

Fractions Day 3: Which is Bigger?

Fractions Day 2: Cover It Up!

Good morning! So I thought I would get this to you prior to Monday in case you have to search for materials to play the game. I love this game! It is easy to play, yet emphasizes so many important fraction ideas that might go missing in a regular math book. We played 3 times and called it quits, because I knew we would continue to play it every day for the entire week and I didn’t want him to tire of it.

Cover It Up!

Materials: The Fraction Kit (See Fractions Day 1 for how to make the Fraction Kit), one kit per person, sharpie, and ideally a blank wooden cube. (See below for alternatives for a cube.) We also used a whiteboard and dry erase pen, but those are totally optional.

How To Play:

  1. Using the sharpie, label the 6 faces (one fraction on each face) of the cube as follows. See below for other options if you do not have a blank cube.dice
  2. Place the 1 whole fraction strip in front of each player. This is your “game board”.
  3. Player 1 rolls the die, and puts that fraction piece on his/her 1 whole to the far left.img_1676
  4. Player 2 rolls the die, and puts that fraction piece on his/her 1 whole to the far left.img_1677 
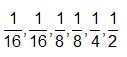
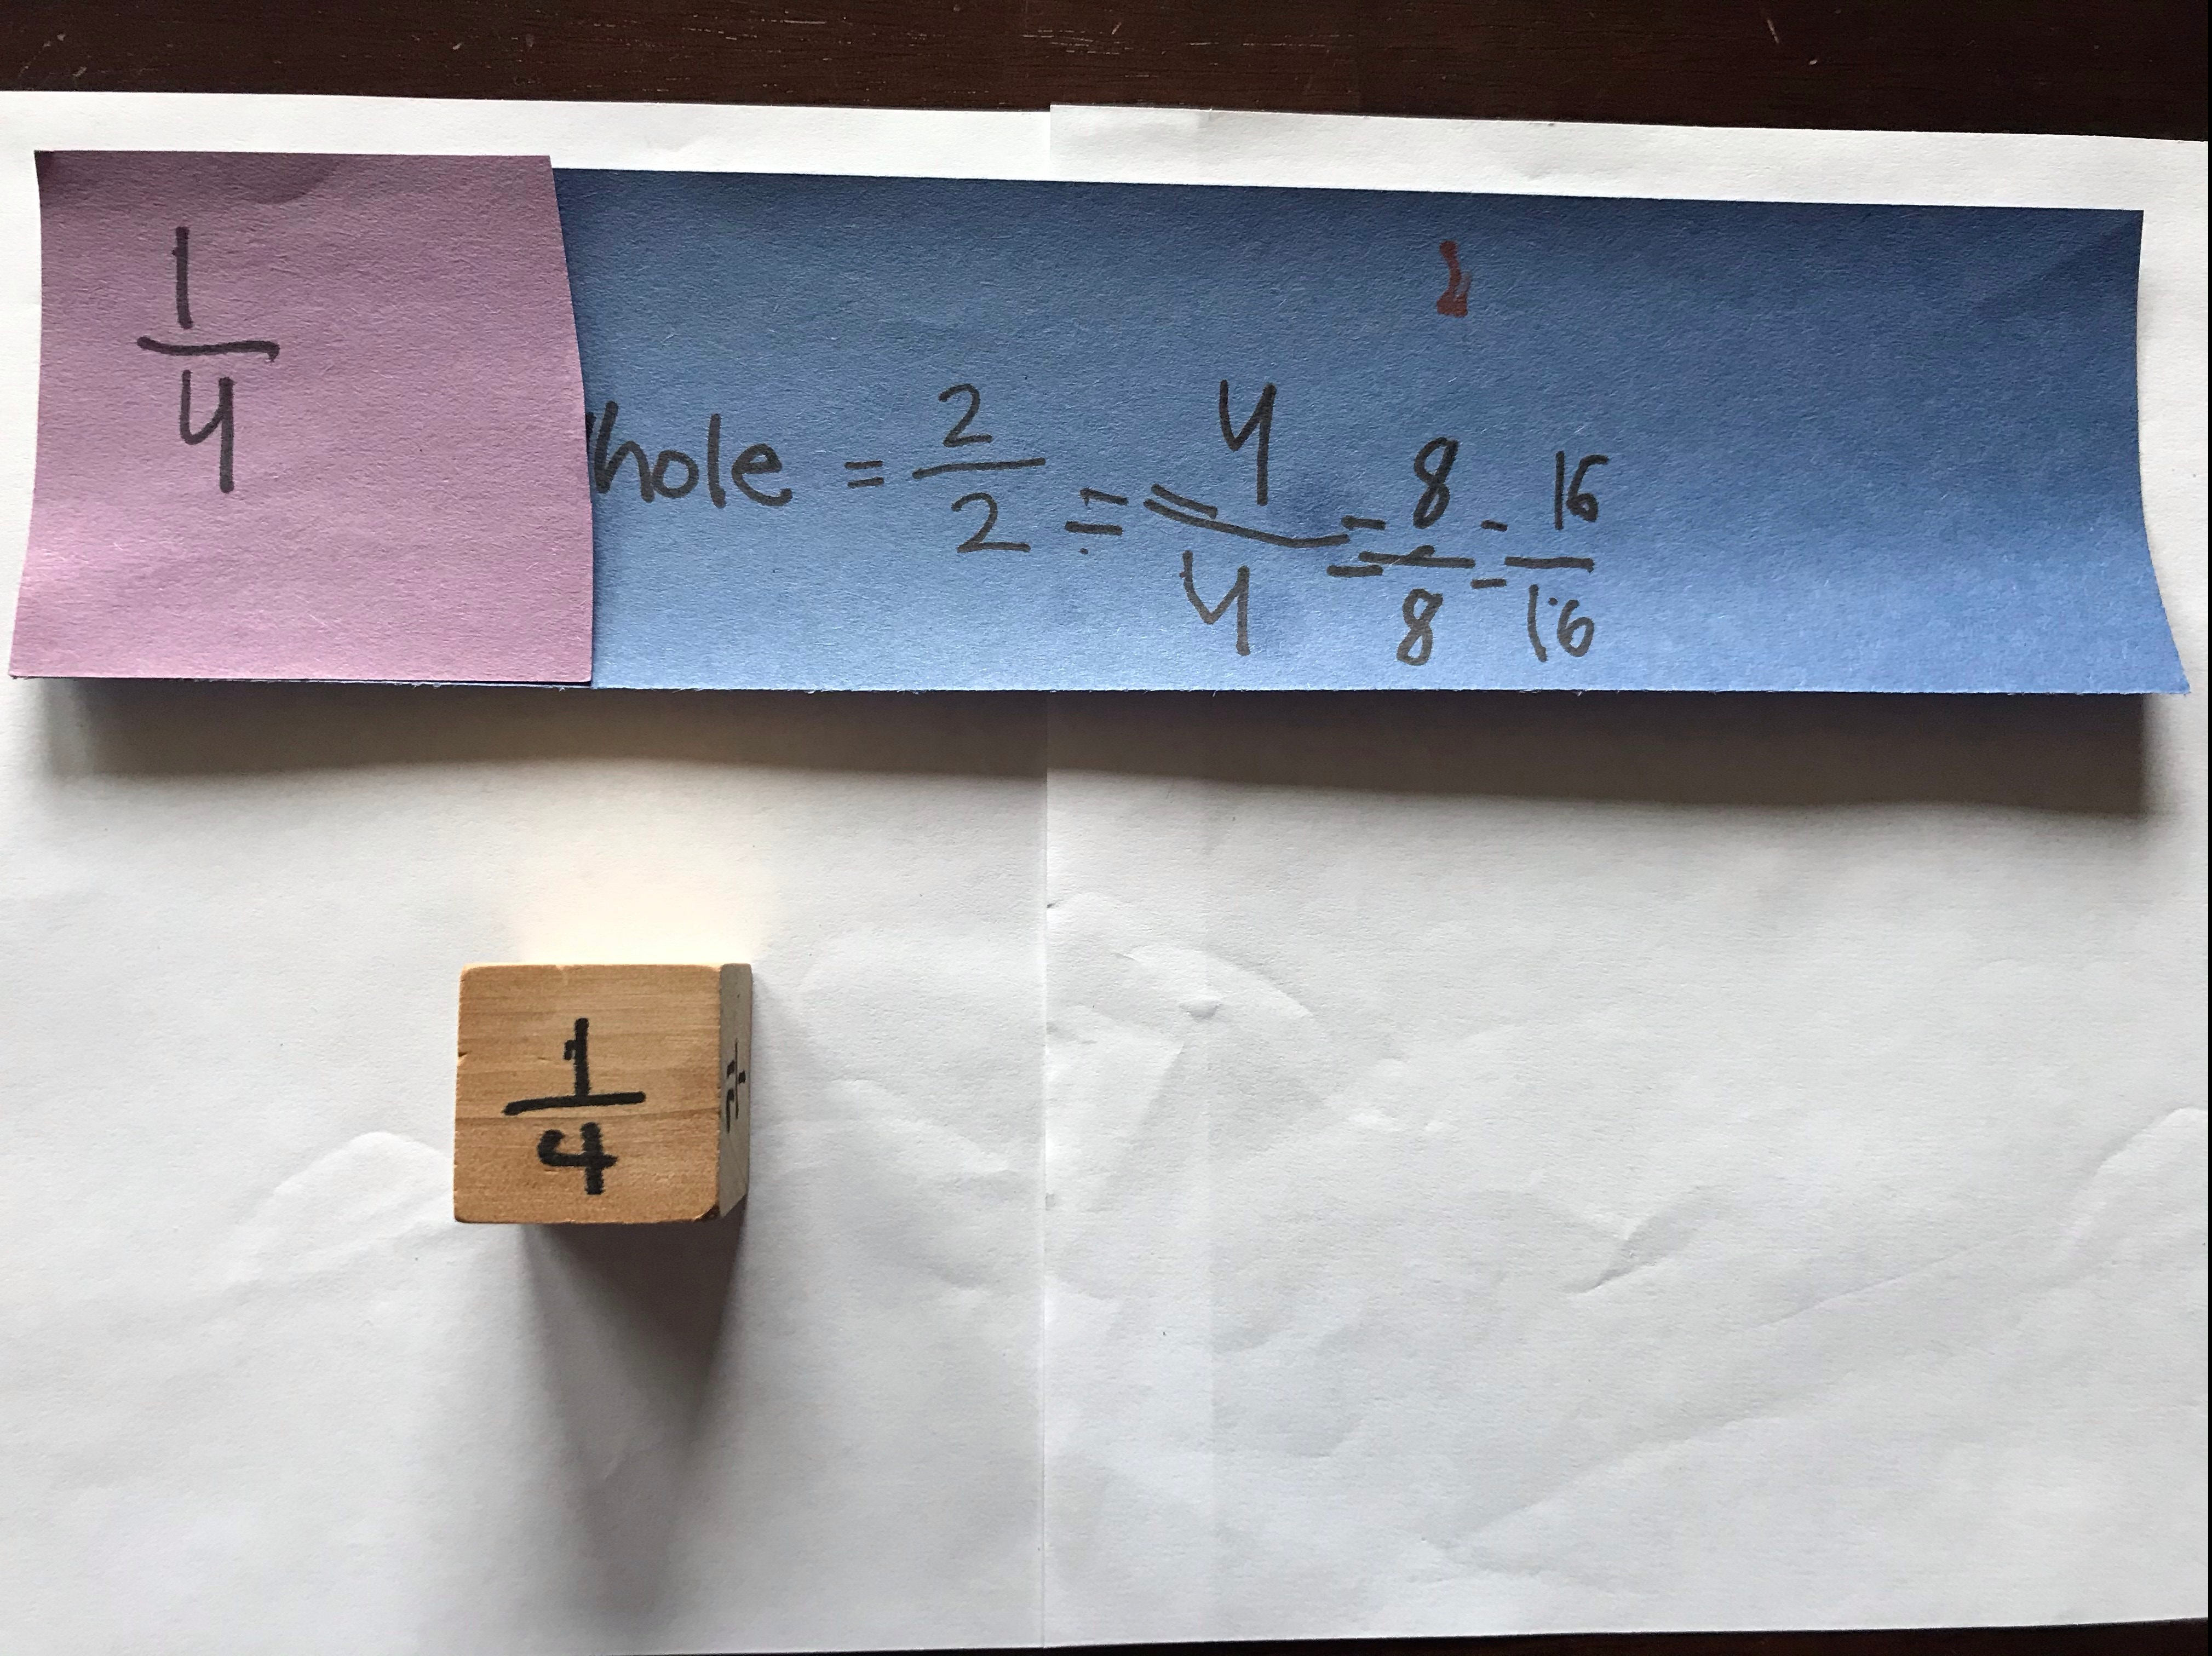
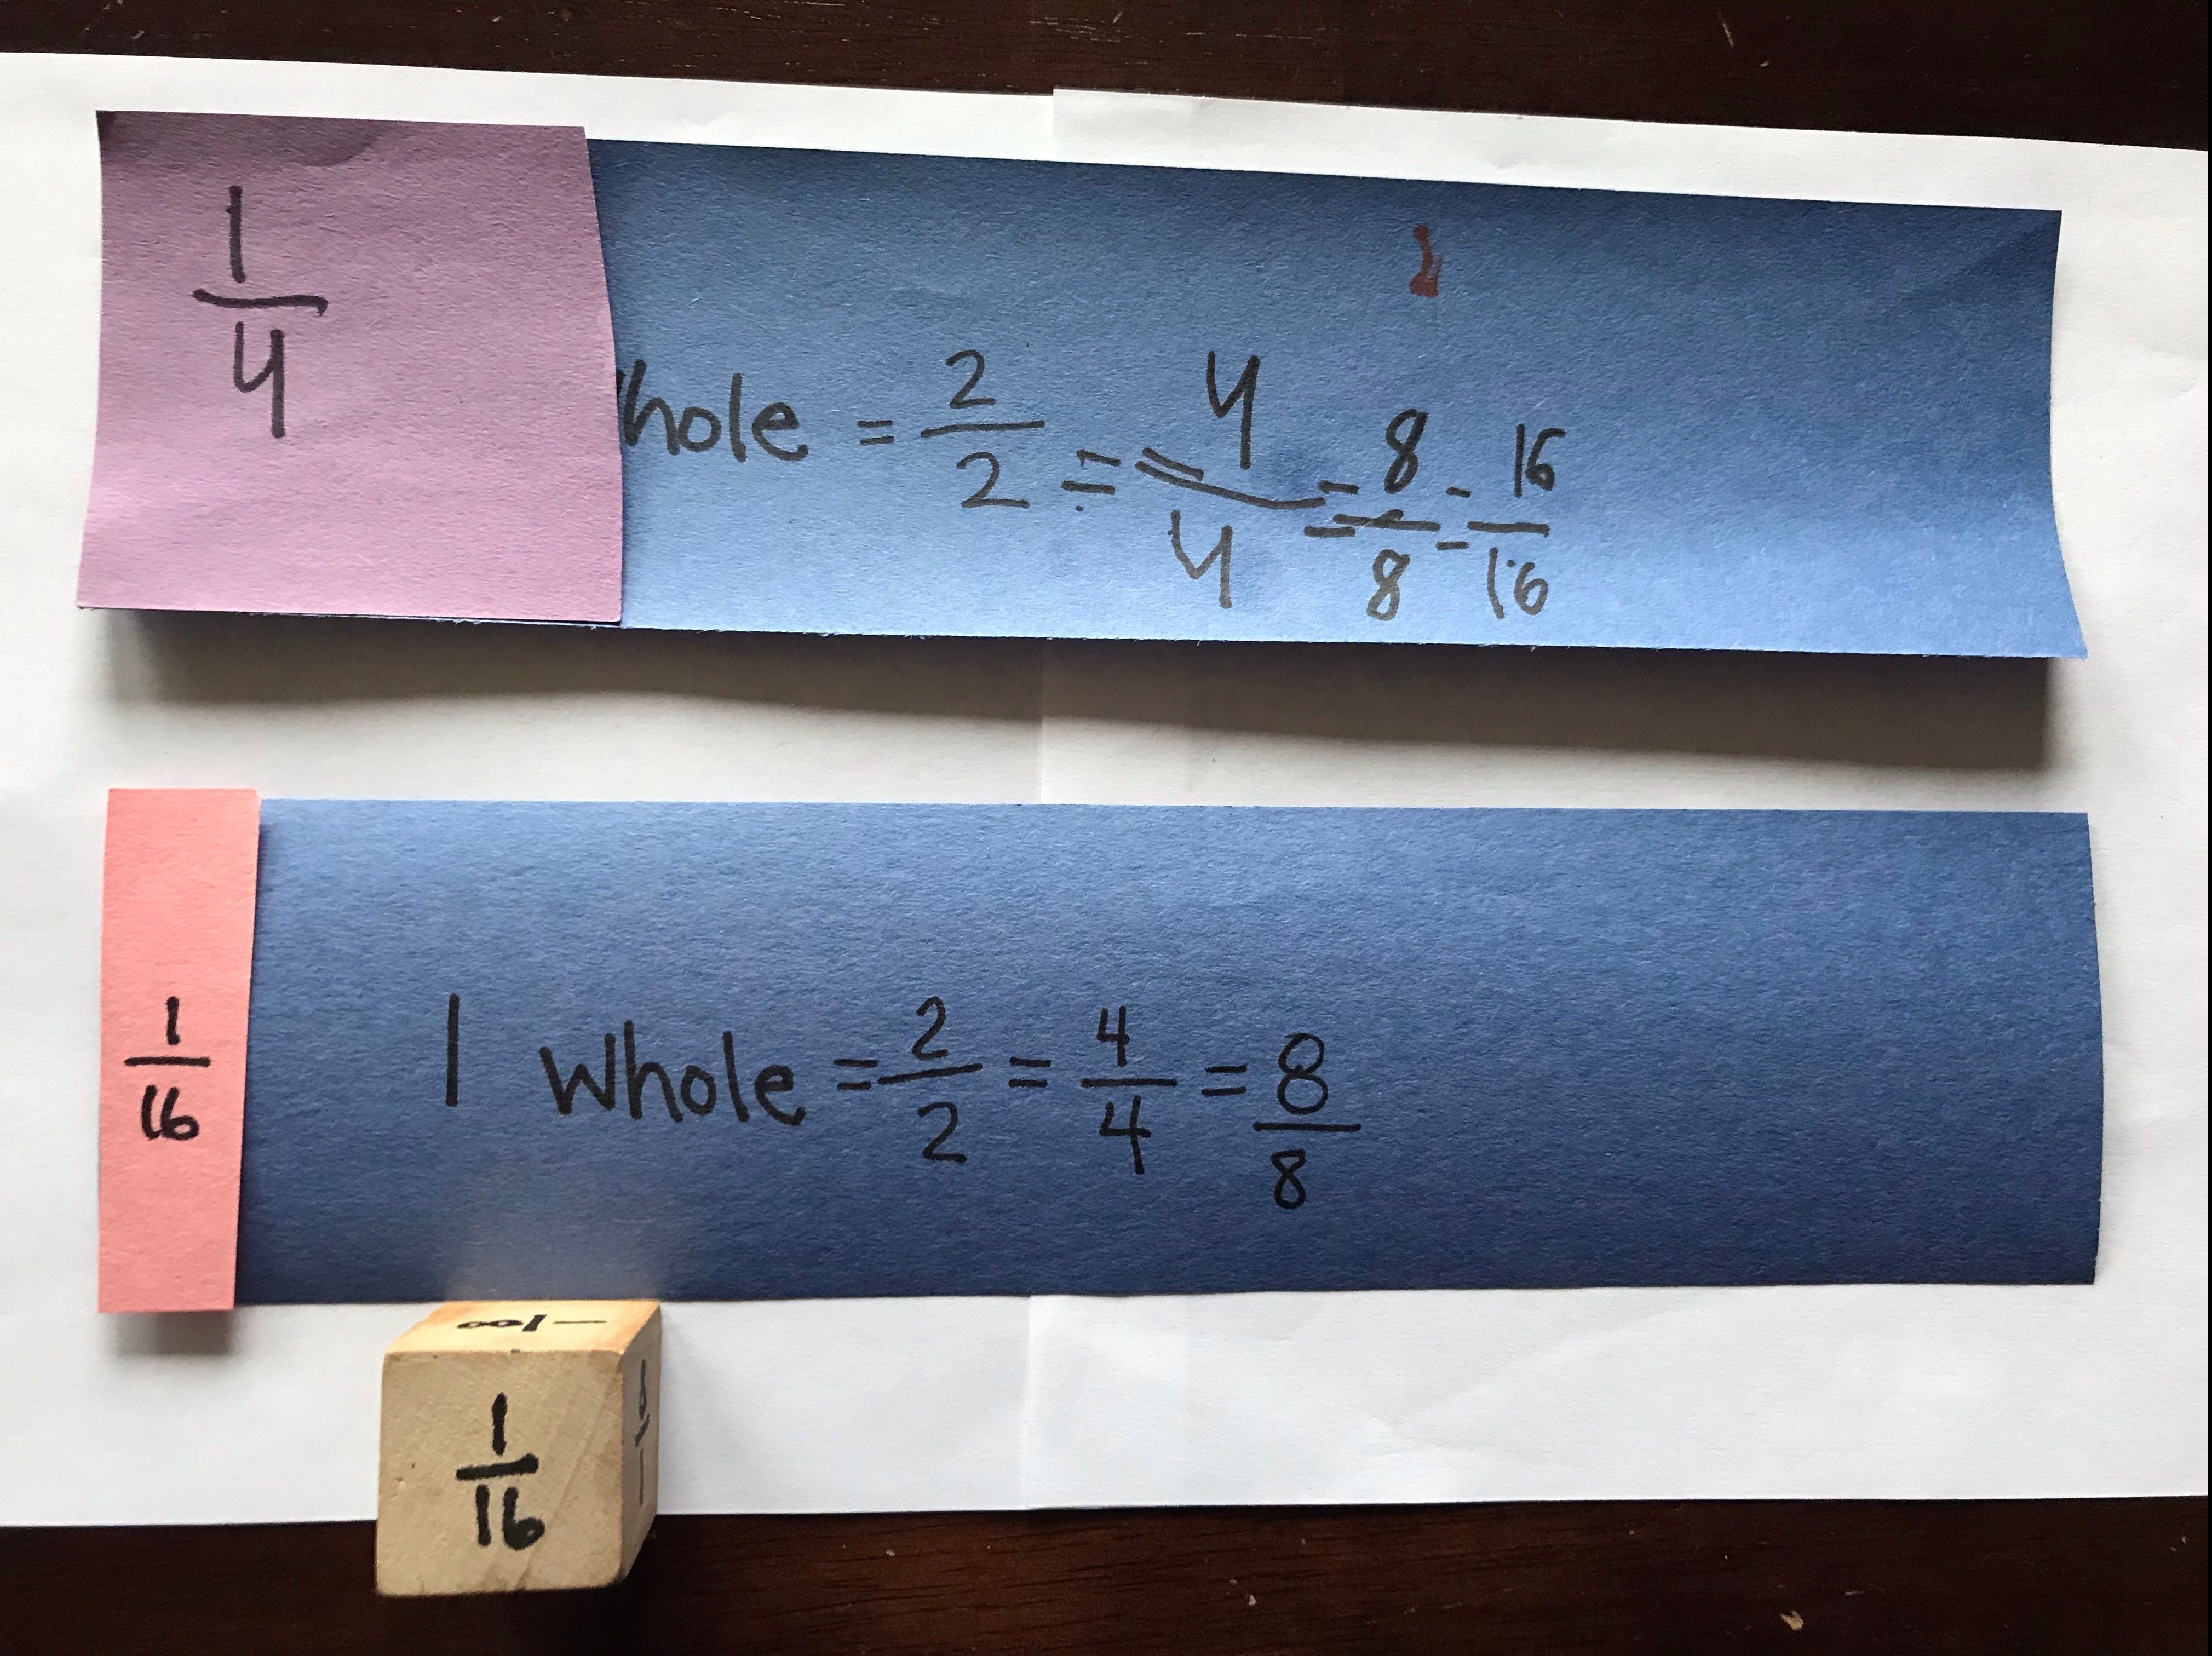
Who has covered up more of their 1 whole? (In our game, Chris had.) How do you know? (Chris originally said, “Because purple is bigger than pink.” I restated, “Oh, so you mean 1/4 is bigger than 1/16?” This helps them start visualizing the size of pieces and prepare for comparing.)
  5. Player 1 rolls the die again and puts that fraction piece right next to the first one so they are touching, but there are no gaps or overlaps (as best as they can). Player 2 does the same on his/her board. Who has covered up more? Who has covered up less? If the two rolls were the same (e.g. I rolled two of the 1/16) How many sixteenths do I have? (2/16).
  6. Play continues until a player covers exactly 1 whole. If a player rolls a fraction that is too big to fit, he/she loses that turn.  Some questions to ask (as appropriate):
    1. Who has more? How much more? (They can use their pieces to figure it out. No actual arithmetic!!!)
    2. Who has less? How much less?
    3. Do you need more or less than 1/2 to win the game? How do you know?
    4. How much more do you need to win (get to 1 whole)?
  7. Once a player has won, have him/her write the number sentence for his/her board. (We totally cheat and I let Chris roll as many times until his board was filled as well.)img_1620
  8. Repeat the game 2 more times. Best out of 3 is the winner.

Alternatives to a Blank Number Cube: If you don’t have a blank wooden cube, below are some options so that you can still play the game. I have done all of these and they are all great options.

  • Make your own die: See below for blank template and write the fractions we used on #1. Note: This is better printed on card stock or heavy paper.
  • Make a spinner. See the PDF below and use Spinner #3. Label the sections as we did the cube above in #1. Using a paper clip and a pencil, place the pencil in the paper clip in the center of the spinner and spin the paper clip. Where it lands is your fraction. This can be on plain paper and it works great.
  • Roll a regular die. See below for the fraction you get for each number on the die. table

For link to die template: https://www.printableboardgames.net/preview/Blank_Die

For link to Spinner Templates:Templates-for-Spinners


Fractions Day 2: Cover It Up!

Fractions Day 1: Naming Fractions

Welcome to Fractions!!!! They are truly our FRIENDS.

These are the lessons I am doing with my 8 year old around fractions. His prior experiences with fractions are:

  • Cooking with me, but let’s be real. He likes to break the eggs and lick  the bowl, so not a whole lot of fraction work going on.
  • The week of flu that he was stuck home with me last year and we played with fraction circles.
  • Whatever they have done in school, which for us isn’t a lot of fraction work until next year.

Many of you might be asking why I am teaching him lessons with fractions (since it really isn’t his grade-level ). I figured that it was new and would be exciting for him versus spending ANOTHER month on regrouping with addition and subtraction. We will get back to that, but the kid needs a break.

Each of these lessons will be 15-20 min. For 8-10 year olds, doing focused work one-on-one with you for that amount of time is plenty.

Our first lesson was creating what Marilyn Burns called a Fraction Kit. You will need one fraction kit per person, including you. These will be used for the next few weeks for many of our lessons.

Materials: 5 different colored construction paper (we will need more colors many days later), scissors, sharpie or black marker

  1. Prior to the lesson, cut the paper so that you retain the length of the construction paper but the width is 3-4 inches. Make every strip the same width.
  2. Have your child choose one of the colors. Chris chose blue. Write on your blue strip length-wise “1 whole” towards the left of the strip. Your child does the same on theirs.
  3. Child chooses a second color. Chris chose pink, because it is Mom’s favorite. (Suck-up!). Help your child fold it in half (see picture).
    1. How many pink pieces make the whole strip of blue? (2)
    2. What do we call one of the pink pieces? (half, or one-half).  Write 1/2 and the word “half” on each of your pink pieces. Your child does the same on theirs. Cut on the fold so that you have 2-halves.
    3. Lay one of the pink on the blue whole. Have your child choral count with you “1- half, 2-halves” which equals 1 whole. On the blue, you both write 2/2 to show it also represents the whole strip.
  4. Child chooses a third color. Chris chose purple. Help your child fold it in half, then half again.
    1. Before they open it back up ask, “How many parts will you have?”  They can open it up to reveal the amount of equal parts. (4)
    2. How many equal pieces do we have? (4)
    3. What would we name one of them? (1-fourth, since it is 1 out of four equal parts that make the whole strip.) Write 1/4 on each of the four parts. Have your child do the same and cut them out.
    4. Lay one of the fourths on the blue strip. Choral count with your child as they lay them side-by-side on their blue strip. “1- fourth, 2-fourths, 3-fourths, 4-fourths (which is the whole strip). Both write 4/4 on the blue strip.
  5. Repeat for eighths and sixteenths. Choral counting is super important, as it builds the importance of what the numerator represents (the number of pieces you have) and the denominator represents (how many equal parts made the whole strip). 

  6. If time, have them consider the following questions, using their new pieces to convince you of their answer.
    1. Which is bigger: 1/2 or 1/4? Why?
    2. Which is bigger: 1/8 or 1/4? Why?
    3. Which is bigger: 1/2 or 1/16? Why?
  7.  Extension: Have your child build the following using their fraction strips. Make them choral count the pieces to convince you they represented the fraction correctly. I cannot emphasize the importance of choral counting fractions. They simply cannot do it enough.2/4
    1. 5/8
    2. 7/16
    3. 8/8 What strip is this the same as? (1)
    4. Their choice!

Explain tomorrow they will get to play a game with their fraction strips! I keep them separate in gallon baggies with our name on each bag.

Happy Naming!

Fractions Day 1: Naming Fractions

Changing Times Call for Changing Posts!

Hi Everyone,

So I started the year wanting to read professionally and discuss within this format. THEN we got put on lock down. So that is stopping NOW (for the time being) and I am altering the nature of my posts.

crazy times

Two different types of blogs will be coming through this page. The first will be personal vignettes of life as we are all stuck together. I have a Senior in high school who is digging sleeping in and working in his pj’s, but ticked off he is missing his state Art competition and uncertain how AP exams will roll out. I have a second-grader with dyslexia and I am on the fast track to learn how to help him learn to read and write (while being a math-geek). So these types of blogs will be real-time and messy, ugly, funny truths.

The second type will be the math I am doing with my second grader around fractions (for now, but if we stay out FOREVER I will have to move on…sigh…I love fractions…). I will post our daily lessons and try and include pics and videos when applicable. If I used a worksheet or blackline masters, I will attach them at the end of each lesson. These will be lessons you can share with other teachers and parents if you so desire.

Though these blogs are now completely meant for me and my well-being, I hope you find some humor and help as needed in this crazy hot mess of a time.

Take care of yourselves!

Jen

Changing Times Call for Changing Posts!

I Get By With A LOTTA Help From My Friends

So NOT the post I thought I would be writing next, but this has been weighing heavy on my heart…

I am blessed to have worked with several educators for consecutive years. This is a true gift, for as a consultant I could be hired and fired at anytime. I treasure the relationships I have with so many educators, as they are in THERE doing awesome work with children, yet still wanting to learn. They fuel my soul, and make me want to give my very all PLUS more when I collaborate with them.

Last week I was working with Special Education teachers and Paraprofessionals. This is unique, as the District feels strongly that their Paraprofessionals should get the same trainings (as they often do the one-on-one work with the kiddos). The elementary team is near and dear to my heart, since my own child has Dyslexia and I tutor many kiddos that have learning disabilities.

During the morning break, one of the teachers came to me and suggested what I would like to call a “duh” moment. Should have already been something I knew, but didn’t. She suggested that, instead of naming our kids as “Autistic Kids” or “Dyslexic Kids”, might I restate it as “Kids with Autism” or “Kids with Dyslexia”?

“The Disability isn’t what defines them.”

Damn.

Absolutely I should rethink my language. Absolutely I need to rethink how I refer to a certain group of students. ABSOLUTELY it does NOT define them!

I love that this amazing person came to me and called me out (privately). I love that I have friends that will tell me when I need to rethink and consider different options.

Consider your cadre of teacher friends. Do you feel like they will call you out when needed? Support you, yet let you know when you can do better? BE BETTER? If not, get a new group of teacher friends!

Thanks, Rachel. You make me want to be a better human.

I Get By With A LOTTA Help From My Friends

The Purpose of Hand Raising

Here we goooooo!!!! I have just started the book, Hacking Questions: 11 Answers That Create a Culture of Inquiry in Your Classroom, by Connie Hamilton. Below is my first    ah-ha moment.

Raise your hand if you have ever asked a question to the class and…

  • The one hand (that always goes up) speeds through the air like Hermoine Granger’s in potions class…
  • Several hands go up and now you must choose…
  • No one’s hand goes up

Yeah, me too. And if you say you have never done this…

thumb_liar-liar-emegeneratdr-net-liar-liar-princess-bride-liar-48841208

We have all done this. And, before reading the first chapter, I would still be doing this. It is what we did in school; it is how we have seen others questions students; it is how it has always been done. But just because that is our norm, should it be the norm for questioning students???

Let’s go back to the three hand-raising options. Here is what I have been thinking about and how this might roll in my class:

  • The one hand (that always goes up) speeds through the air like Hermoine Granger’s in potions class… So now everyone else can breathe a sigh of relief as she answers. Or if I don’t let her answer, she gets all impatient and sighs vehemently.
  • Several hands go up and now you must choose… I spend 4-5 precious minutes going through multiple responses and get some answers I wasn’t ready for and now I have to think on the fly about a positive way to respond.
  • No one’s hand goes up…I answer for the class and basically take the learning away from them.

Here is what hit me: “Disengagement is the enemy of learning. We unintentionally create the conditions for disengagement when we allow students to keep their hands down”    (p. 21).

Say whaaaatttt??? THIS was not my intent when I ‘cold-called‘ (the term in the book for hand-raising) on students. These are my questions I want to reflect on for this week as I move forward with this slap-me-in-the-face realization. I invite you to think about them as well:

  • What is my purpose for using ‘cold-calling’ in class?
  • What is the purpose of questioning in my class? What do I want to get out of my questions?
  • How am I asking students these questions? Are there ways in which I can ask questions and get more feedback and engagement?

I am hoping to get into some elementary math classes this week and reflect on these as I teach. I encourage you to comment below or email me your reflections. Let’s learn together! jen.moffettllc@gmail.com


The Purpose of Hand Raising

Lesson Study: Lines of Best Fit

I had the privilege of working with Integrated 1 teachers last week on statistics. We voiced our concern that students are often given the line of best fit for a data set rather than exploring how to create it themselves. We also wondered why their stats chapter was not right after exploring equations in slope-intercept form, as that how we wanted students to write the equation for the line they created.

Our goals for creating the lesson were as follows: 1) Students would review writing a linear equation in slope-intercept form from a graph, 2) Students would create lines of best fit for data plots on a graph, and 3) Students would write the equation for the line of best fit in slope-intercept form.

After searching several open resource sites, we settled on using some graphs from an earlier exploration to review writing equations of lines (please see the attached worksheet). We felt that these graphs would be easier for students to be able to read, and allowed students to determine the slope either by counting or by using their slope formula when given two points. We didn’t want the lesson to get stuck in this review section, so the cleaner the graphs were, the better. We strategically chose two with positive slopes, two with negative slopes, some with fraction values and one with a y-intercept of 0 so that we could frontload the necessary skills before moving to the new concept of creating lines of best fit.

The second component of the lesson was the Desmos activity, Fit Fights (see link below). We wanted to use the activity to build understanding for how lines of best fit are created. We used the following questions to drive the discussions:

  • What do you notice?
  • What do you think the gray lines represent?
  • Do the data points make a line if we connect them? Is this a linear function? Why or why not?
  • Do the data points gravitate towards making a line? Would it be a positive or negative (or zero or undefined for the graphs they created) slope?
  • If we drew a line to ‘best fit’ our data points, where might it go?
  • How can you tell if your line is a good fit for the data points?

The third component of the lesson was to relate the lines of best fit students created to writing equations of linear functions in slope-intercept form. We took snap shots of the lines of best fit from the Desmos activity, strategically choosing lines that had at least two whole number coordinates. We purposefully related the warm up to the lines of best fit, using similar language and questioning.

Our Take-Aways

  • Our students are successful in determining the slope by counting rise/run, but need to continue to work on using the slope formula when given two points.
  • The Desmos activity only had negative slope lines of best fit. Consider having students create data points that could have lines of best fit that have other correlations so they don’t overgeneralize and think it will always be a negative correlation.
  • Students struggle when the axis are scaled differently. Need to build in some warm-ups that continue to explore differently scaled axes.
  • We need to be clear in our questioning. Using questions such as, “Are we good? Do you get it?, etc.” does not give us formative information to move forward.

Below are some of the students’ work and what they felt they had learned. Overall, students were more engaged with this lesson than they have been in the past when learning this concept. We deflines of best fit 1
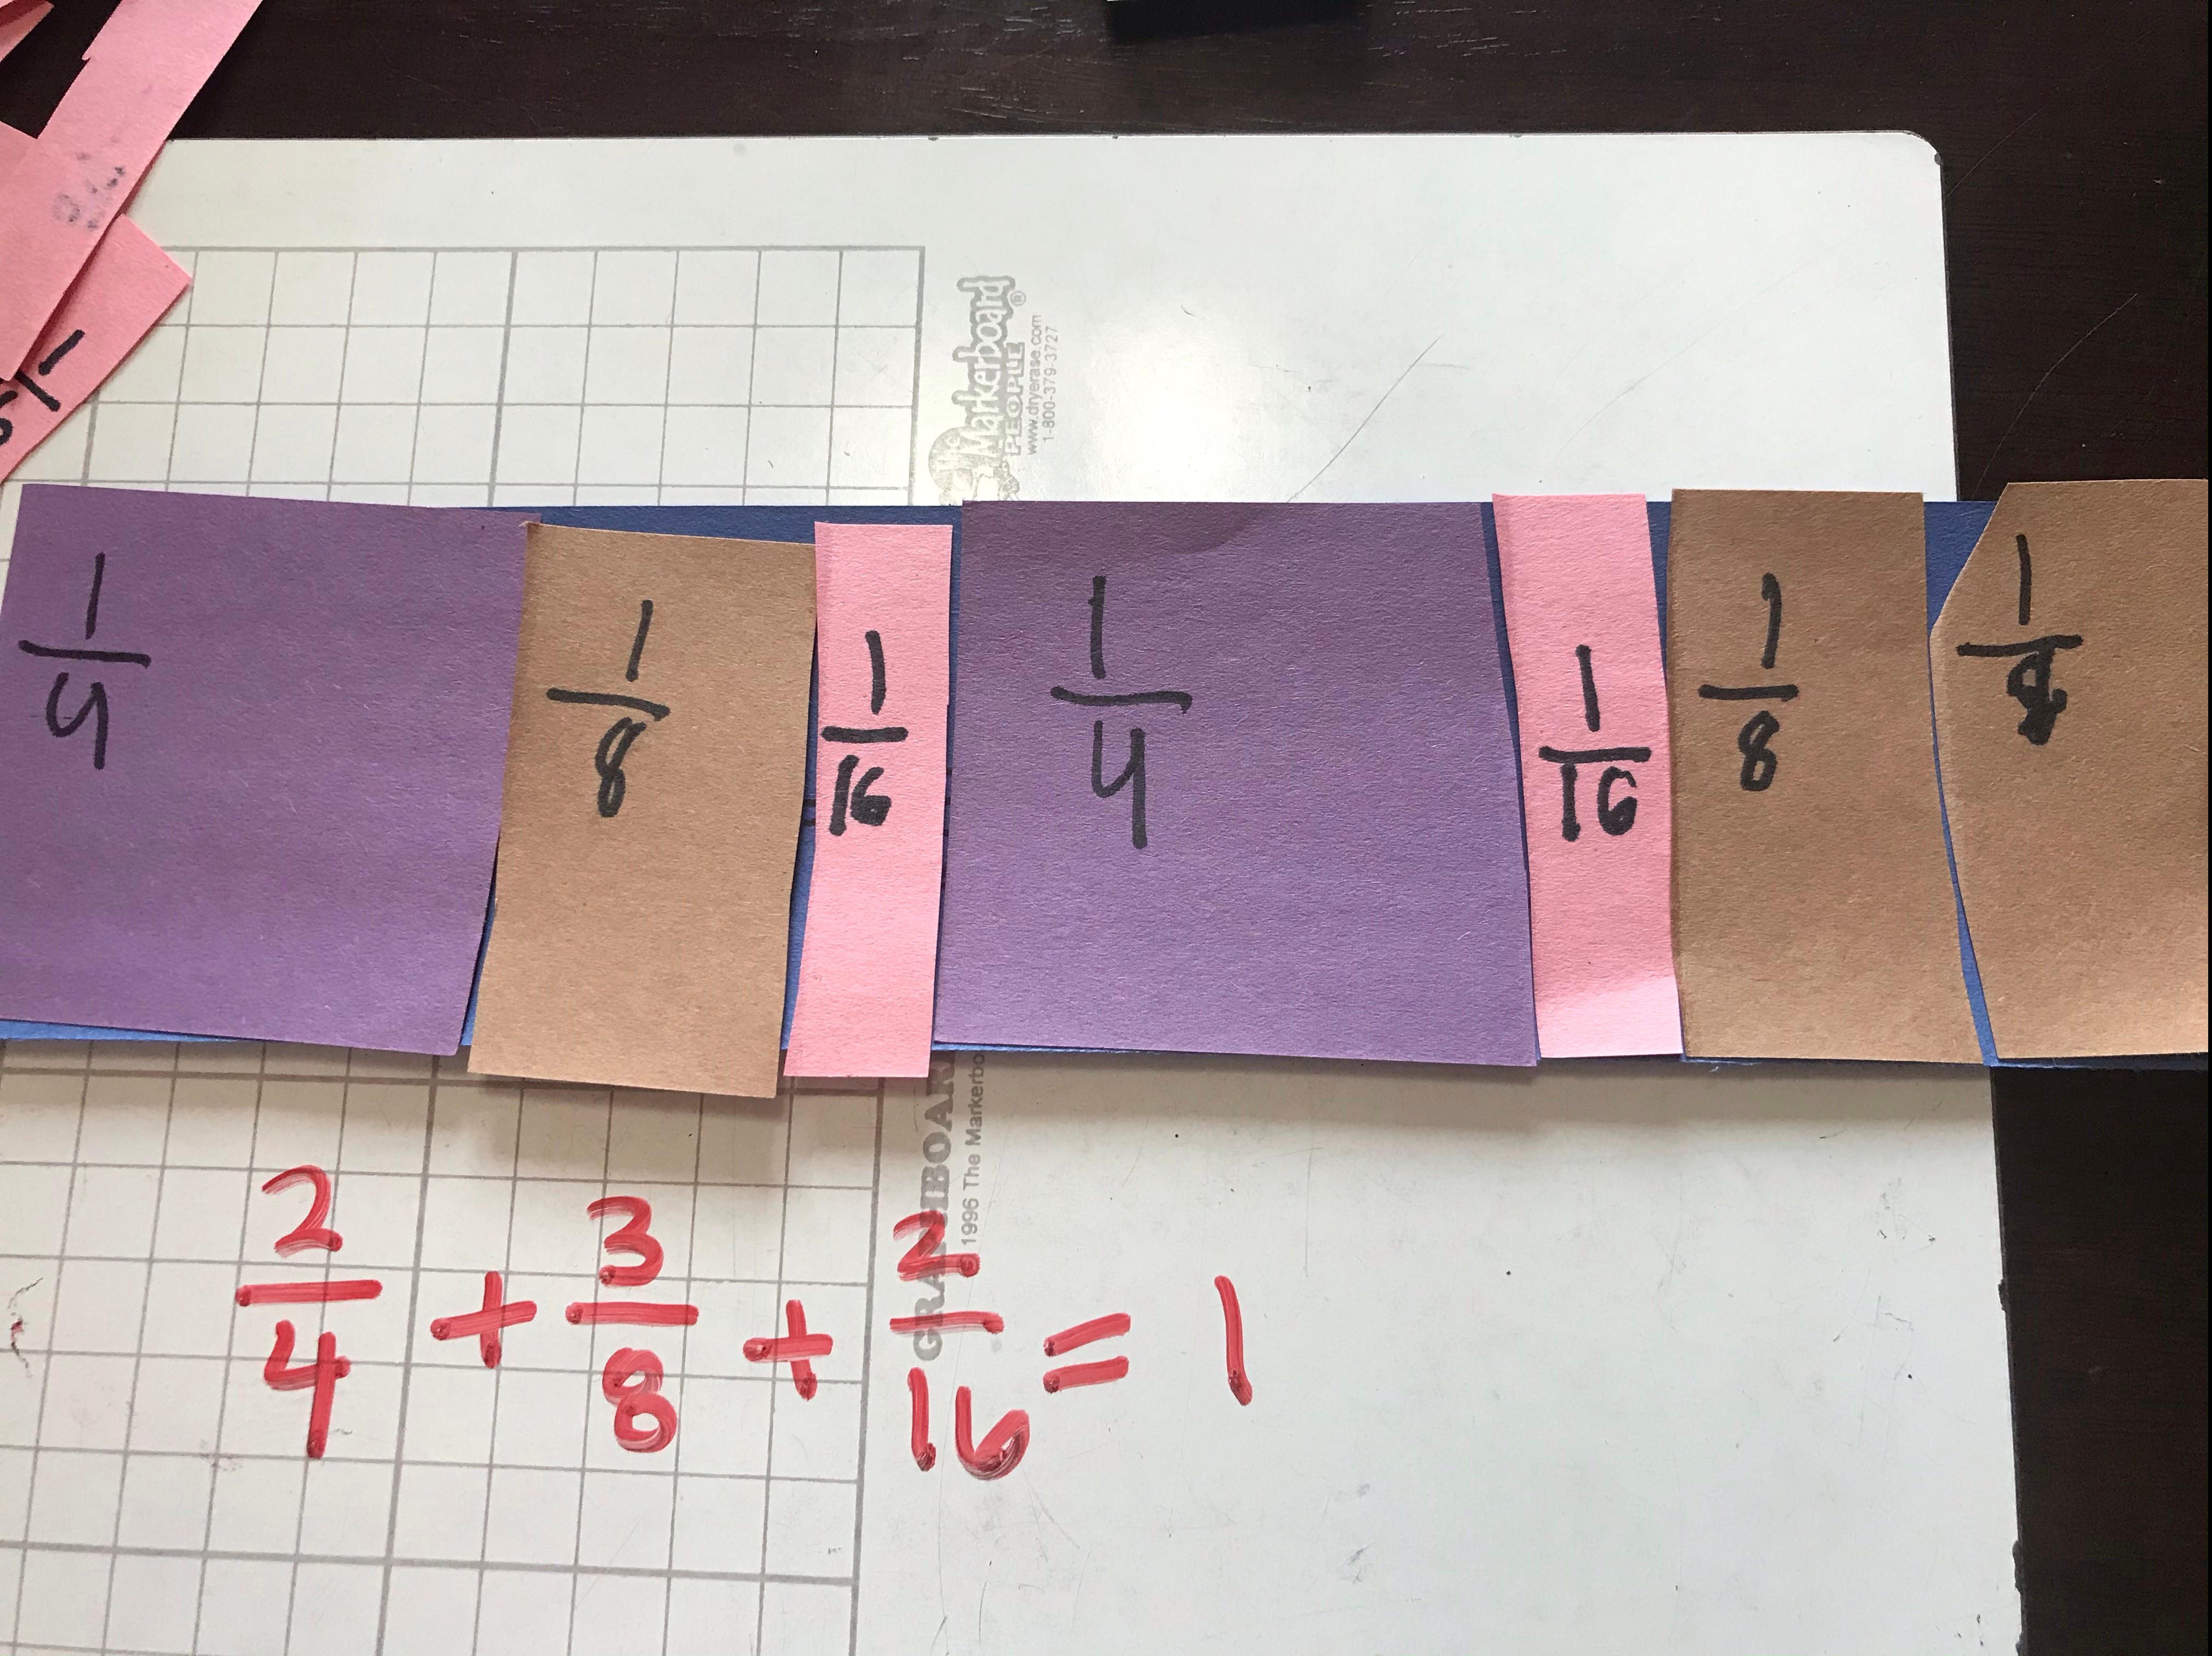
initely want to use this lesson again, and hope you find it helpful as well!

lines of best fit 2


Desmos Fit Fights: https://teacher.desmos.com/activitybuilder/custom/5c5bc938531af975828d9e92

Lesson Study Worksheet (Shout out to Fontana High School!): Stats Lesson Study Worksheet


Lesson Study: Lines of Best Fit