Fractions Finale: The Last One!

No pun intended. We are at the end of our exploration of initial fraction ideas. Even though I am a mathematics educator, and have been for over 20 years, this experience has taught me a few things.

  1. NEVER underestimate a child. Though I knew what answers or ideas I wanted, they were not always what I got. And often, his answers and ideas were simpler and quite frankly, better.
  2. Time, Time, TIME! Give lots of time to build these critical foundational concepts. Just when I thought, “He’s got this!”, the next day I would question and he would hesitate. Children need lots of time to practice, to play, to explore, and to find how to say and think about the ideas themselves.
  3. Wait Time is not only necessary; it is CRITICAL. There were so many videos I cringe when hearing it again. Those times when I should have just sat quiet, and waited for him to work it out. The wait time isn’t awkward for him; it’s awkward for me. When I did just take a swig of coffee (instead of butting into his thinking) the thoughts he figured out were amazing.
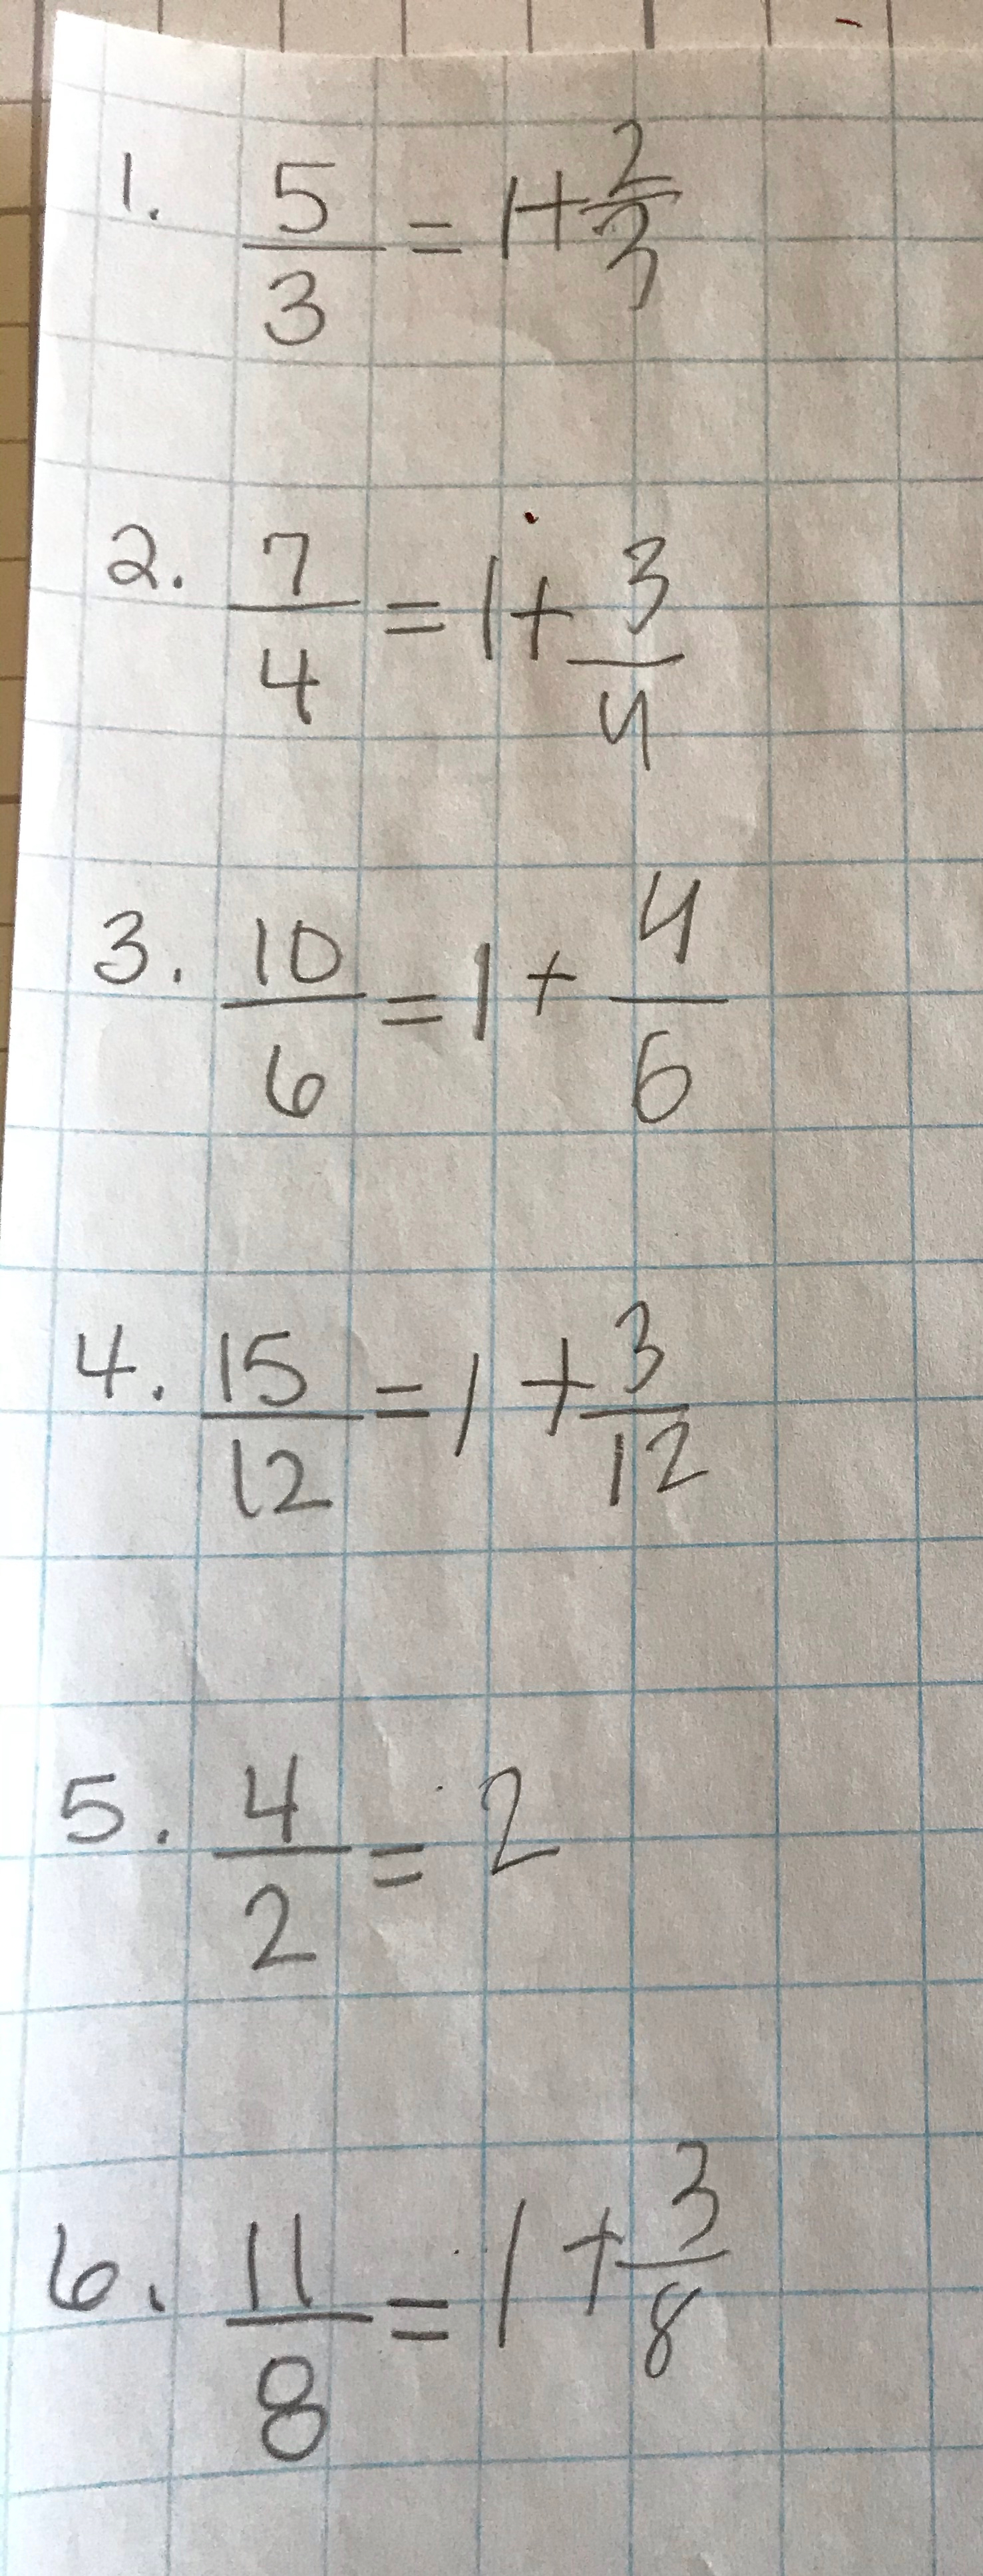
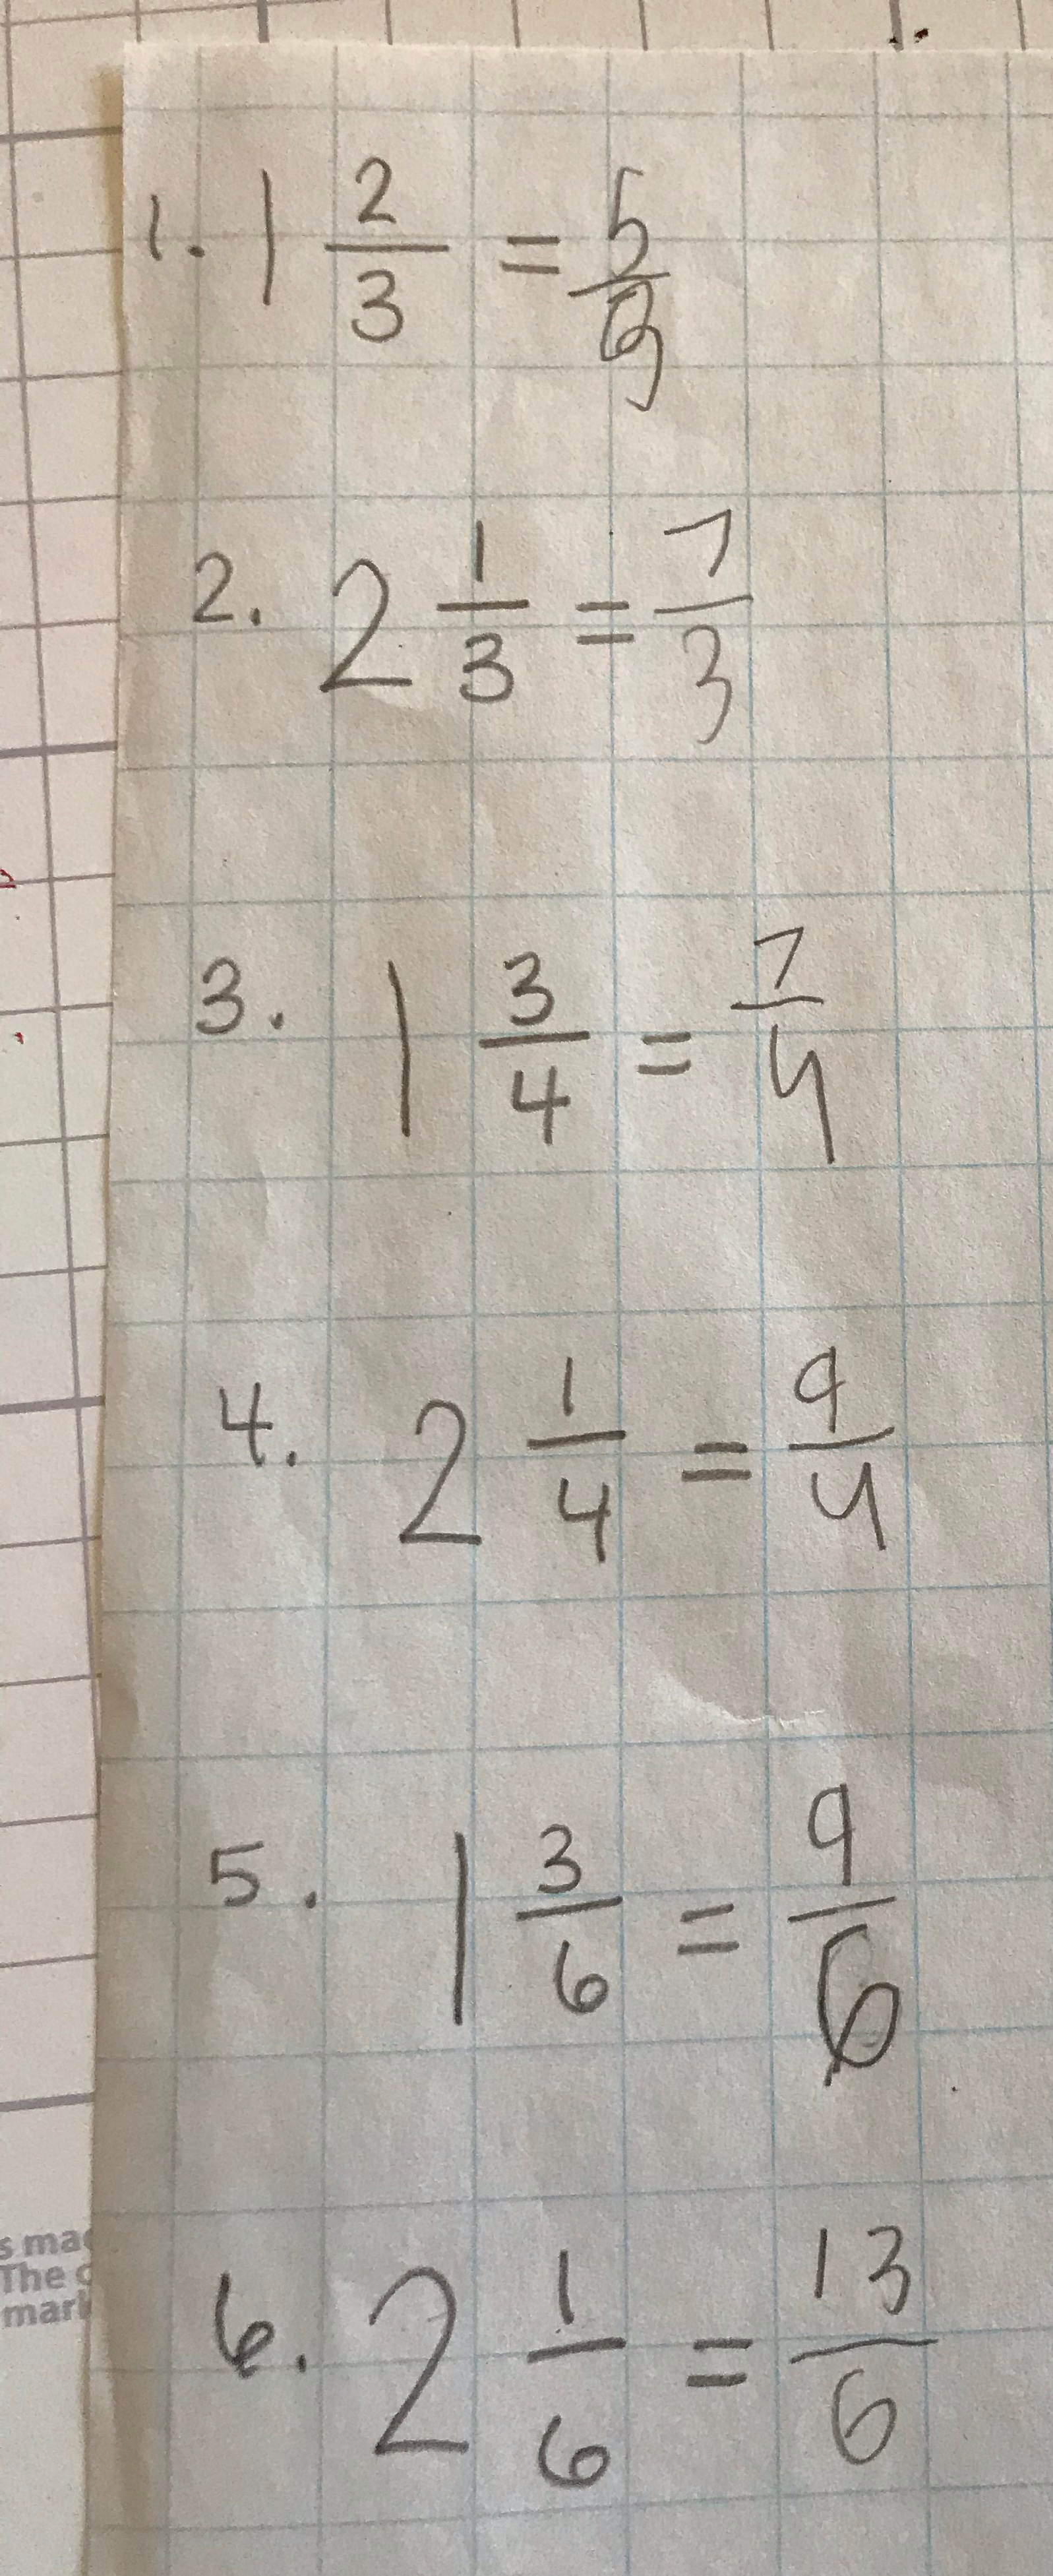
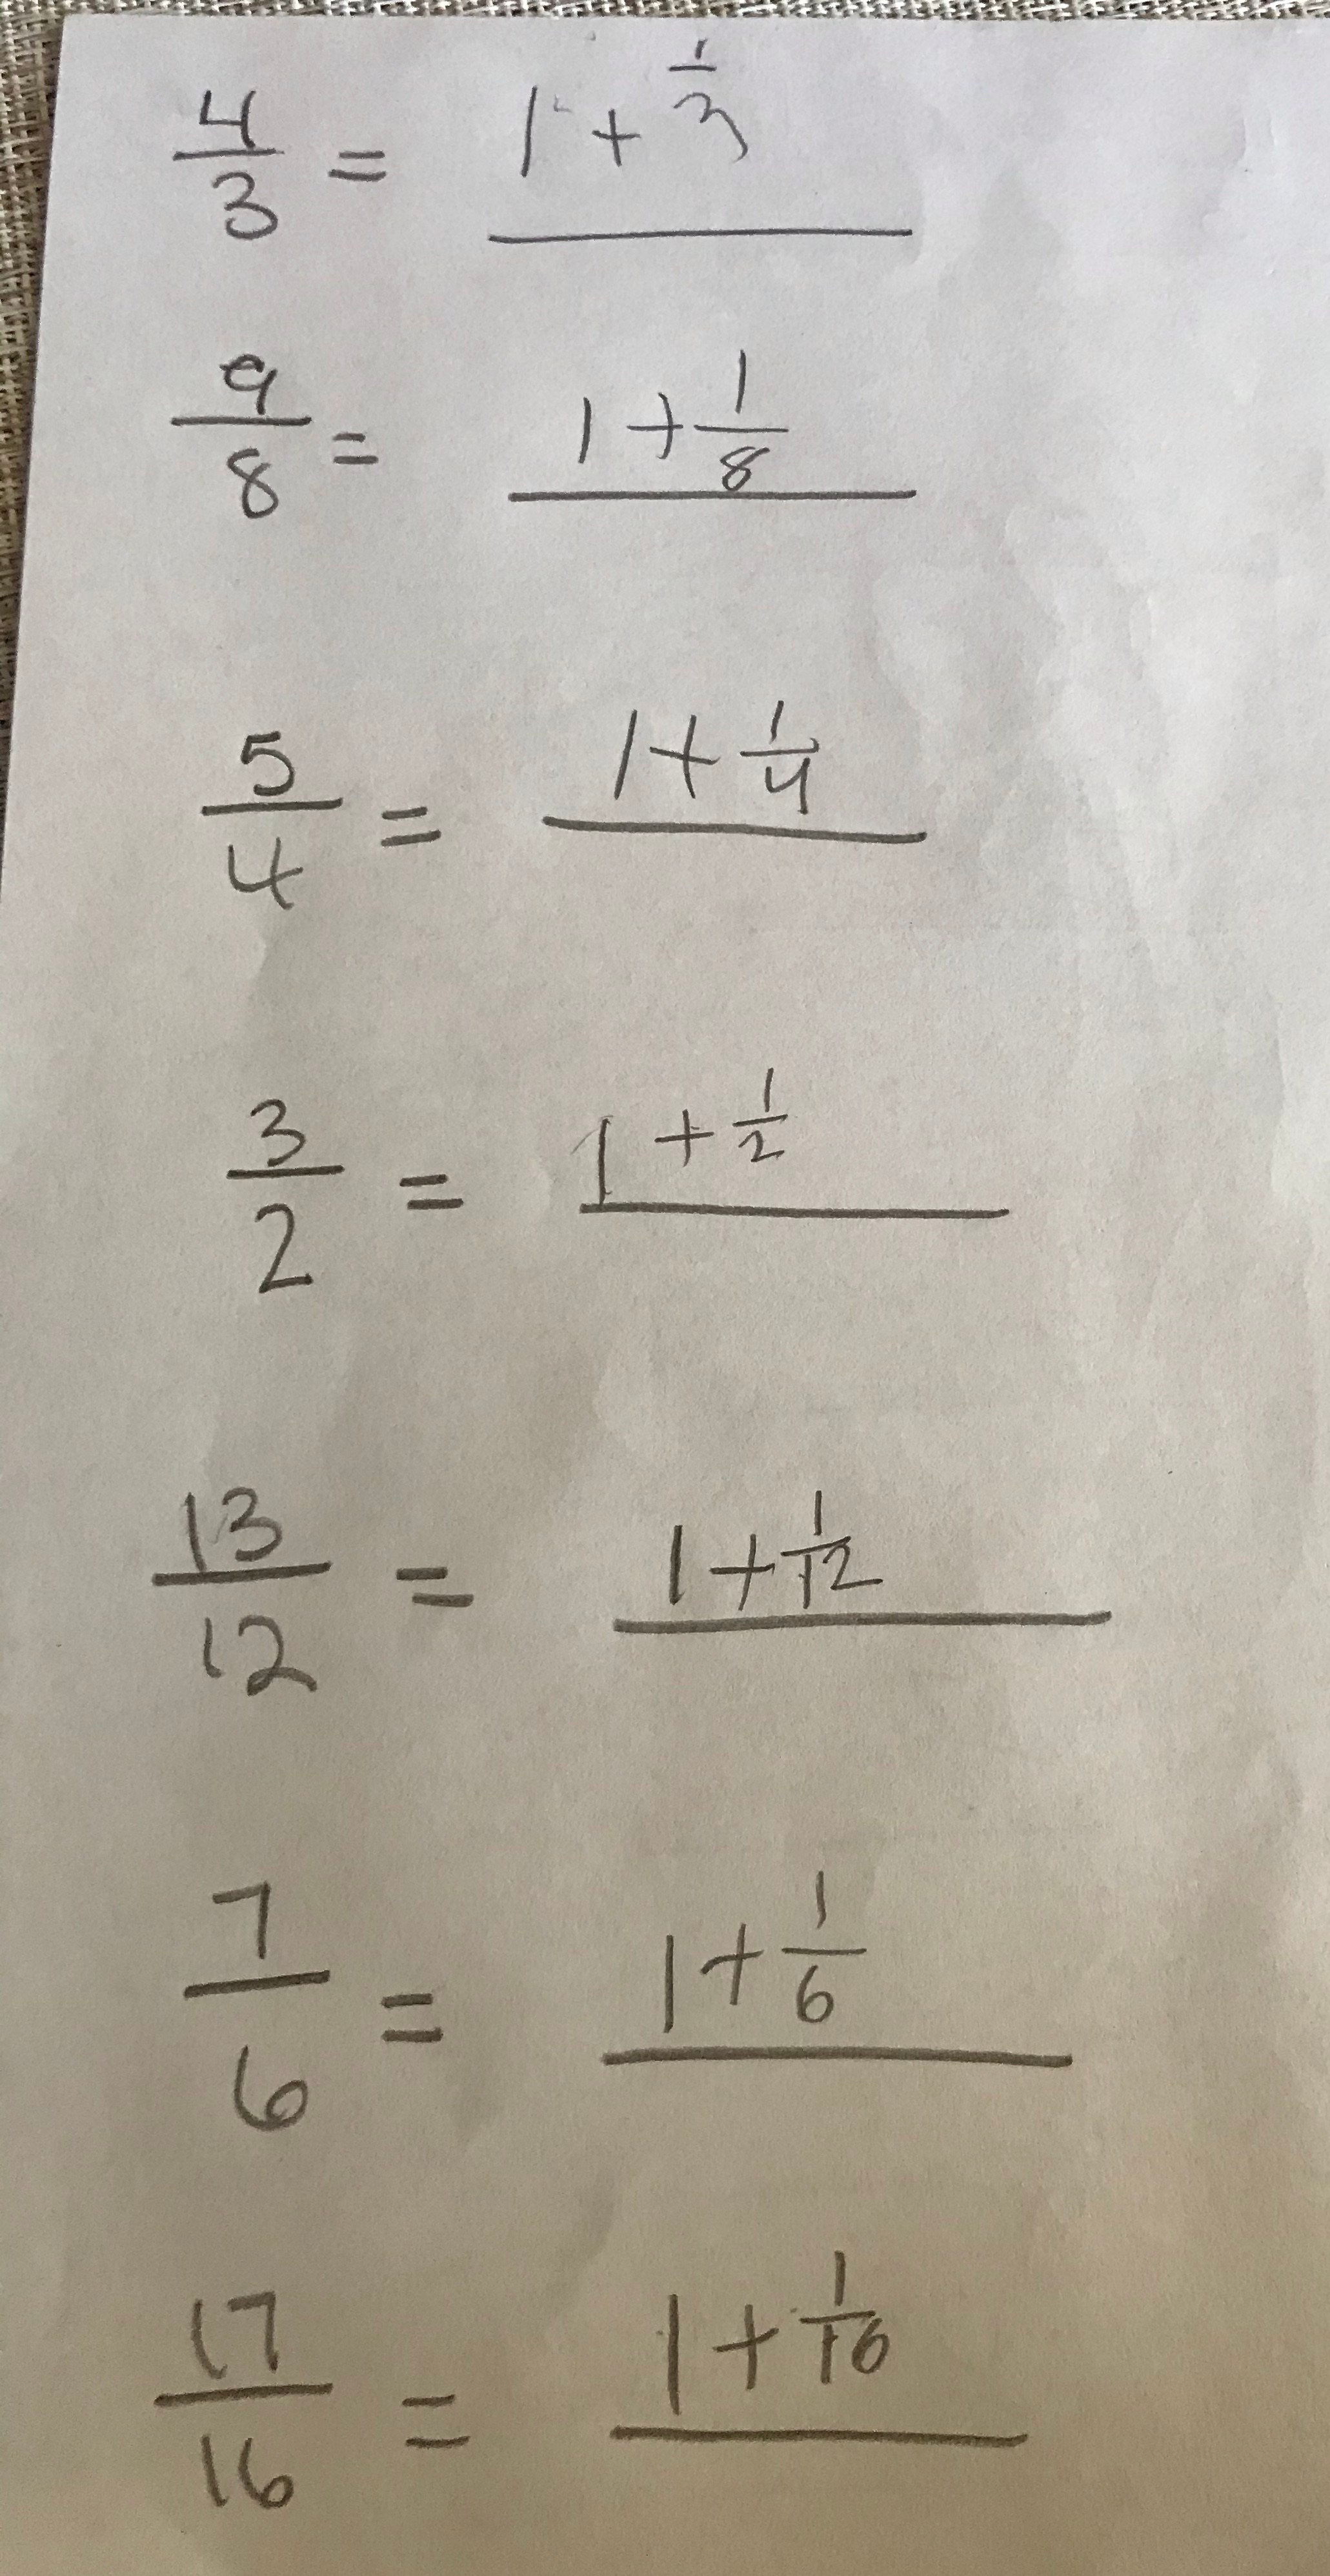
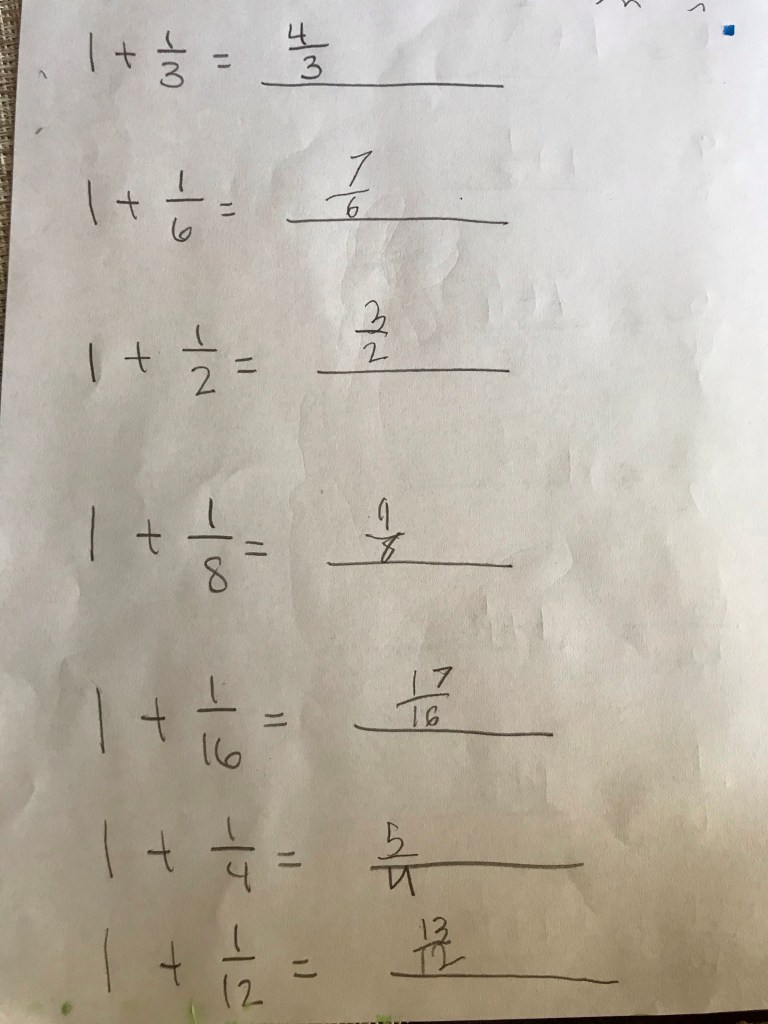
  4. “Mommy, this was FUN!” We often have a running joke in middle and high school where we say fractions are our friends (and not the other f-word). So many students are traumatized by the lack of understanding they have with fractions. Yet here is my 8 yo asking to play games, to cook, and to learn about fractions. Because it made sense to him. Because he got time to process and practice. Because he understood the relationships and how to utilize those relationships to make meaning.
Until Next Time!

We are on to measurement and I hope to revisit equivalence, addition and subtraction of fractions in May. I hope you were able to enjoy this journey with your little(s) as much as we did. 🙂

Take care of each other, stay home, and stay healthy.

Fractions Finale: The Last One!

Fractions Day 14: To Be or Not to Be (Equal to 1/2)…

Good morning! This is the last lesson of this series of 15-20 min initial fraction explorations. I would have gone on for the duration of distance learning, but we have some measuring to do!

  1. We warmed up with some comparing of fractions. Using index cards, I just wrote a bunch of fractions (that he could check with the fraction strips). We flipped the cards face down and mixed them up. He would flip a card face up; I would do the same. We would compare our fractions, and whoever had the largest fraction got to keep the cards. Which one is bigger? How do you know? (Example: I know 1/2 is bigger than 3/8 because 4/8 is a half.) He often had to show me with his fraction strips to explain (See here? This one is bigger.). Note that some of the fractions are equivalent, which gave us some nice places to pause and discuss who won. I let him choose how to deal with the equivalent ones (He chose to put them back upside down and reshuffle.). See below for fraction cards for the game.
  2. I gave him the problems below. Each one compares 1/2 to other fractions. 1/2 is considered a “benchmark fraction”. It is a great one to use for estimation and relating to the size of other fractions. We looked at each pair individually. Is the fraction greater than, less than, or equal to half? How do you know? Notice the first 6 pairs start with the equivalent relationship, to push Chris into using half to reason about the very next pair of fractions with the same denominator. The last three pairs were to see if he would apply the “comparing to half” strategy. Below is a video of his thinking.
Comparing 6/8 to 1/2.

If I had another day, I would continue with this idea of comparing to half. It caused Chris to really consider how the numerator and denominator related to each other and to the fraction 1/2.

Comparing to 1/2.
Fractions Day 14: To Be or Not to Be (Equal to 1/2)…

Fractions Day 13: Never Too Easy!

Fun Friday!!! I was NOT going to do fractions today, but he said yesterday (Fractions Day 12) was too easy. I hate that phrase. It is never too easy, it either makes sense…or it doesn’t. So I figured I would push him on his understanding just a bit. I have found that using obnoxiously large/small numbers really gets at the heart of whether kids understand a concept. Making them ‘ridiculous!‘ makes it fun and allows kids to generalize their thinking to all numbers, not just the ones they are familiar with.

We stuck with unit fractions (fractions such as 1/2, 1/3, 1/5…) so we could generalize what the denominator represents in the fractions we have explored. (Day 14 we change up the numerators!)

  1. We revisited the comparison symbols. This was a struggle. It is important to note that Chris has Dyslexia, so symbols ‘fly around in his head‘. The greater than and less than symbols (< and >) are super tough, because they look the same to him (Like a b and a d in reading.) I changed the dry erase colors for each to help. Throughout this lesson, he knew which fraction was the largest, but needed help knowing how to draw the inequality symbol.
  2. I started with unit fractions that we had in our fraction kit, just in case he wanted to check his work. (He didn’t.) We started with 1/2 and 1/8. Which fraction is bigger? (1/2) How do you know? (Moooommmm…. look at it! 1/2 is this! Pointed to the white fraction strip. And 1/8 is this! Pointed to the brown fraction strip. So 1/2 is waay bigger.)Below are the unit fractions in his kit we explored. Note they are the same ones we did on Fractions Day . He didn’t notice!
  3. On the whiteboard, I wrote 1/6. Write a fraction that is larger than 1/6. (He wrote 1/2.) I wrote 1/6 < 1/2. Tell me what that number sentence means. (That 1/2 is bigger than 1/6.) Good enough for me! I then wrote 1/2. Write a fraction that is larger than 1/2. (I love this! He wrote 1. Well, it REALLY is 2/2 and that is bigger than 1/2! YESSSSS!!!!). We did one more from the fraction kit: 1/8. (He wrote 1/3 is larger.).
  4. The next one I wrote was 1/20. I loved his face! His eyes got big and he said, Man that is one small fraction! We had fun exploring different ridiculous numbers, writing fractions that were larger or smaller than the ones I gave.
How can you tell which unit fraction is smaller?

I asked Chris to summarize what we had learned. How can you tell, just by the fractions we used today, if one is smaller than another? In the above clip, you can hear his thinking. Not exact, not sophisticated, but honest and on the right track for the work we did today!

Write a fraction that is larger than mine.
Write a fraction that is smaller than mine.
Fractions Day 13: Never Too Easy!

Fractions Day 12: Renaming Mixed Numbers and Improper Fractions

Children often struggle with understanding how to rename an improper fraction to a mixed number (and vice versa). They learn ‘slick tricks’, such as Around the World or The Circle Method (I have no idea what that means). In fact, when I googled how to change a mixed number into an improper fraction, the first dozen (I stopped looking) used titles with “Easy”, “Trick”, “Fast”, and “The Neat Way”. Who are these ways easy for? Certainly they are easy to learn…and then forget.

My stance is to take time to work with small whole numbers (1 and 2, for instance) and concrete models (such as our fractions kits) and let children figure it out for themselves. It may take time, but in the end they will remember and will figure out a ‘slick trick’ that works for them.

  1. Played “Cover it Up”, first version (Please see Fractions Day 2 for directions) three times. He still wants to play, so we still play!
  2. Wrote 5/3 on his whiteboard. How many wholes could we make? (1) How many thirds would we have left? (2) So you would have 2-thirds? (Yeah. That is what I said, mom!) How could we write that amount? (1 + 2/3) So you have 1 AND 2/3 (That is what I wrote, mom!) Clearly I was annoying today. However, I wanted to make sure we restated the ideas clearly using appropriate language. He didn’t hear the difference, but I did.
  3. We continued with renaming improper fractions as a whole number + fraction. I tried to continue the questioning, but he worked so quickly I didn’t have time to question as he did some of them. He got stuck for a quick moment on 4/2. (It’s just 2 wholes, right mom? Because 2/2 = 1 and if I double that I get 2, right?) Otherwise, this progressed much faster than I thought it would!
  4. We then moved to renaming mixed numbers as improper fractions. I started with the same number as before: 1 2/3. Show me 1 whole and 2/3. (Mom, I can do this without the fractions (strips). Okay…Then if I want to rename this in all thirds, how many thirds would I have? (3/3 is a whole, so two more would make 5.) Five of what? (5 of the thirds) How would I write that? (Wrote 5/3 on the paper.)
  5. Again, I was surprised at how quickly he grasped this and was able to reason out each one without the fraction strips. Below is a clip of him reasoning out 7/3.
Renaming 2 1/3

It is important to note that Chris didn’t use the fraction strips, but could have. Each child is different and needs different representations to understand the math. If your child would like to continue using the fraction strips to work through the problems that is awesome! They are still gaining understanding regarding equivalence and renaming fractions greater than 1.

Below are the improper fractions and mixed numbers we explored.

Renaming Improper Fractions
Renaming Mixed Numbers
Fractions Day 12: Renaming Mixed Numbers and Improper Fractions

Fractions Day 11: ‘One More’ Than a Whole

Note: The title is not mathematically accurate, but since my tiny kept using the phrase I figured it was an appropriate way to express the meaning behind the lesson.

So often when students learn about improper fractions and mixed numbers, it is smooshed together as one lesson. I disagree. I think we should focus first on a little bit (unit-fraction) more than the whole to really understand how the whole number relates to our denominator. So though this lesson may seem unnecessary, I think it is a critical first move for children who are learning the relationship between fractions and whole numbers.

Thinking about 3-halves.
  1. Played the first version of “Cover it Up!” See Fractions Day 2 for directions on how to play the game. (We play 3 times.)
  2. Show me 4-thirds. (Chris laid them out side-by-side). How would we write that number? (He wrote ‘4/3’ on his whiteboard.) Is this more or less than a whole? How do you know? (It is more. He showed the whole strip, blue for us, and compared.) How much more? (1 more. ) One more of what? (1 more third.) So how can I write 4/3 in a way that tells me it is a whole and a third more? (He wrote ‘1+1/3’.)
  3. I showed him the very fancy worksheet. (Pencil and paper my friends are amazing!) The first one is 4/3. He wrote in ‘1 + 1/3’. I was going to start the same way with the next improper fraction, 9/8, but he said, “I can do it without the fractions, mom!” And he did! What amazed me was that he didn’t notice the pattern that they were ALLLLL a whole and 1/denominator more. He always said the whole number as a fraction (Example, 1 is the same as 8/8.) and added the unit fraction to it. (So 8/8 plus one more eighth is 9/8.)
  4. I flipped our fancy worksheet over and modeled for Chris the 1 whole strip and 1/3 more, laying them out as one long strip. How could I name this? (1 and a third more). If I want to name the length just in thirds, how many thirds would I need? (4-thirds.)Though I showed him the first two (Please see video below for 1 + 1/6.), he did the rest of them without needing the physical fraction strips.
Thinking about 1 1/6.

As I noted in Fractions Day 10, spending so much time at the beginning with the physical fraction strips and really exploring how the different size pieces relate was extremely important for this lesson. He ‘sees’ the pieces in his head and can mentally find relationships without needing procedures or sets of rules he may (or most likely may not) make sense of. This understanding will continue, as you will see tomorrow! Be well!

For the sequence of the fractions (both sides) on my fancy worksheet:

Renaming improper fractions as 1 + a unit fraction more.
Renaming 1 + unit fraction as improper fractions.
Fractions Day 11: ‘One More’ Than a Whole

Fractions Day 10: Show Me the Fraction!

Happy Thursday! I had thought about moving on to comparing, but a friend (You TOTALLY rock, Jen H.!) suggested thinking about fractions over a whole. Now that I have another week out of school, we reviewed with all of the denominators and moved slowly into mixed fractions.

A couple of things before we start…

  • Chris is in second grade, but even if he knew his multiplication facts I would never start there with fractions. Notice everything we have done has been built from the manipulatives (fraction kit) and not from rules or procedures. This is done on purpose, as you will see the power of it on Day 12.
  • We go slow to grow. You may think, “Could she GO any slower on these? Let’s move along now!” Remember, you get it. They do not. Let them process, let them get comfy, let them be successful. The slow to grow will pay off time and time again, versus speeding up and having to reteach time and time again. As the guide on this fraction journey, you choose your path, so choose wisely.
  • Though I have had Chris convince me with the fraction strips for most of these lessons, you will notice that I will slowly stop requiring it if he shows he is understanding. If I am unsure or not convinced, we can always go back to the physical models.
Fractions I read aloud for Chris to model and name symbolically.
  1. Played, “Cover it Up!” three times with the old dice (halves, fourths, eighths, and sixteenths).
  2. I read fractions aloud one by one and Chris modeled them with his fraction kit. He then wrote next to each what the symbolic fraction looked like. (This was a GOOD thing to do, as there were a few he wasn’t sure which was the numerator and which was the denominator.) Above are the fractions I read. Notice that each numerator is one of the pieces from our fraction kit, to ensure that he understood the numerator tells me the number of the size pieces. The denominator is the actual size of the pieces (How many of them make a whole). The last fraction was to get into our next part.
  3. I wrote 3/2 on the board and he modeled it with the fraction pieces. Is this longer or shorter than a whole? (Longer) How do you know? (Demonstrated with the blue 1 whole strip.) How much longer is it than a whole? (1/2 more). We did this several times using similar questioning until he could answer without using the fraction strips. Below are the fractions I wrote for him to model and discuss.
Fractions I wrote down for Chris to represent and rename as a whole and a unit fraction.

Notice the fractions I wrote were only a unit fraction more than the whole. This was intentional, as I really wanted him to understand that 1 = a/a. For example, 5/4 is 4/4 and 1/4 more. This will be very important for the next two lessons! Also, the fractions were done in the order we created them. I knew he had more familiarity with the halves, fourths, etc. Therefore I started at a place of comfort before moving to the new sets and to fractions we could not represent with our kit.

Thinking about 5/4 as 4/4 and another 1/4.

Fractions Day 10: Show Me the Fraction!

Fractions Day 9: Cover it Up! Game 2

The one thing I love about trying this out with my little is that mistakes help us either laugh or learn (or both). Here is a laughable moment that I would totally do differently next time.

Materials: The Fraction Kit (See Fractions Day 1 and Day 8 for how to make the Fraction Kit), one kit per person, sharpie, and ideally a blank wooden cube. (See Fractions Day 2 alternatives for a cube.) We also used a whiteboard and dry erase pen, but those are totally optional.

How To Play:

  1. Using the sharpie, label the 6 faces (one fraction on each face) of the cube as follows: 1/2, 1/3, 1/4, 1/6, 1/8 and 1/16. Reflecting back, I would have swapped the 1/16 out for 1/12. May have to try this next week…
  2. Place the 1 whole fraction strip in front of each player. This is your “game board”.
  3. Player 1 rolls the die, and puts that fraction piece on his/her 1 whole to the far left.img_1676
  4. Player 2 rolls the die, and puts that fraction piece on his/her 1 whole to the far left.img_1677 
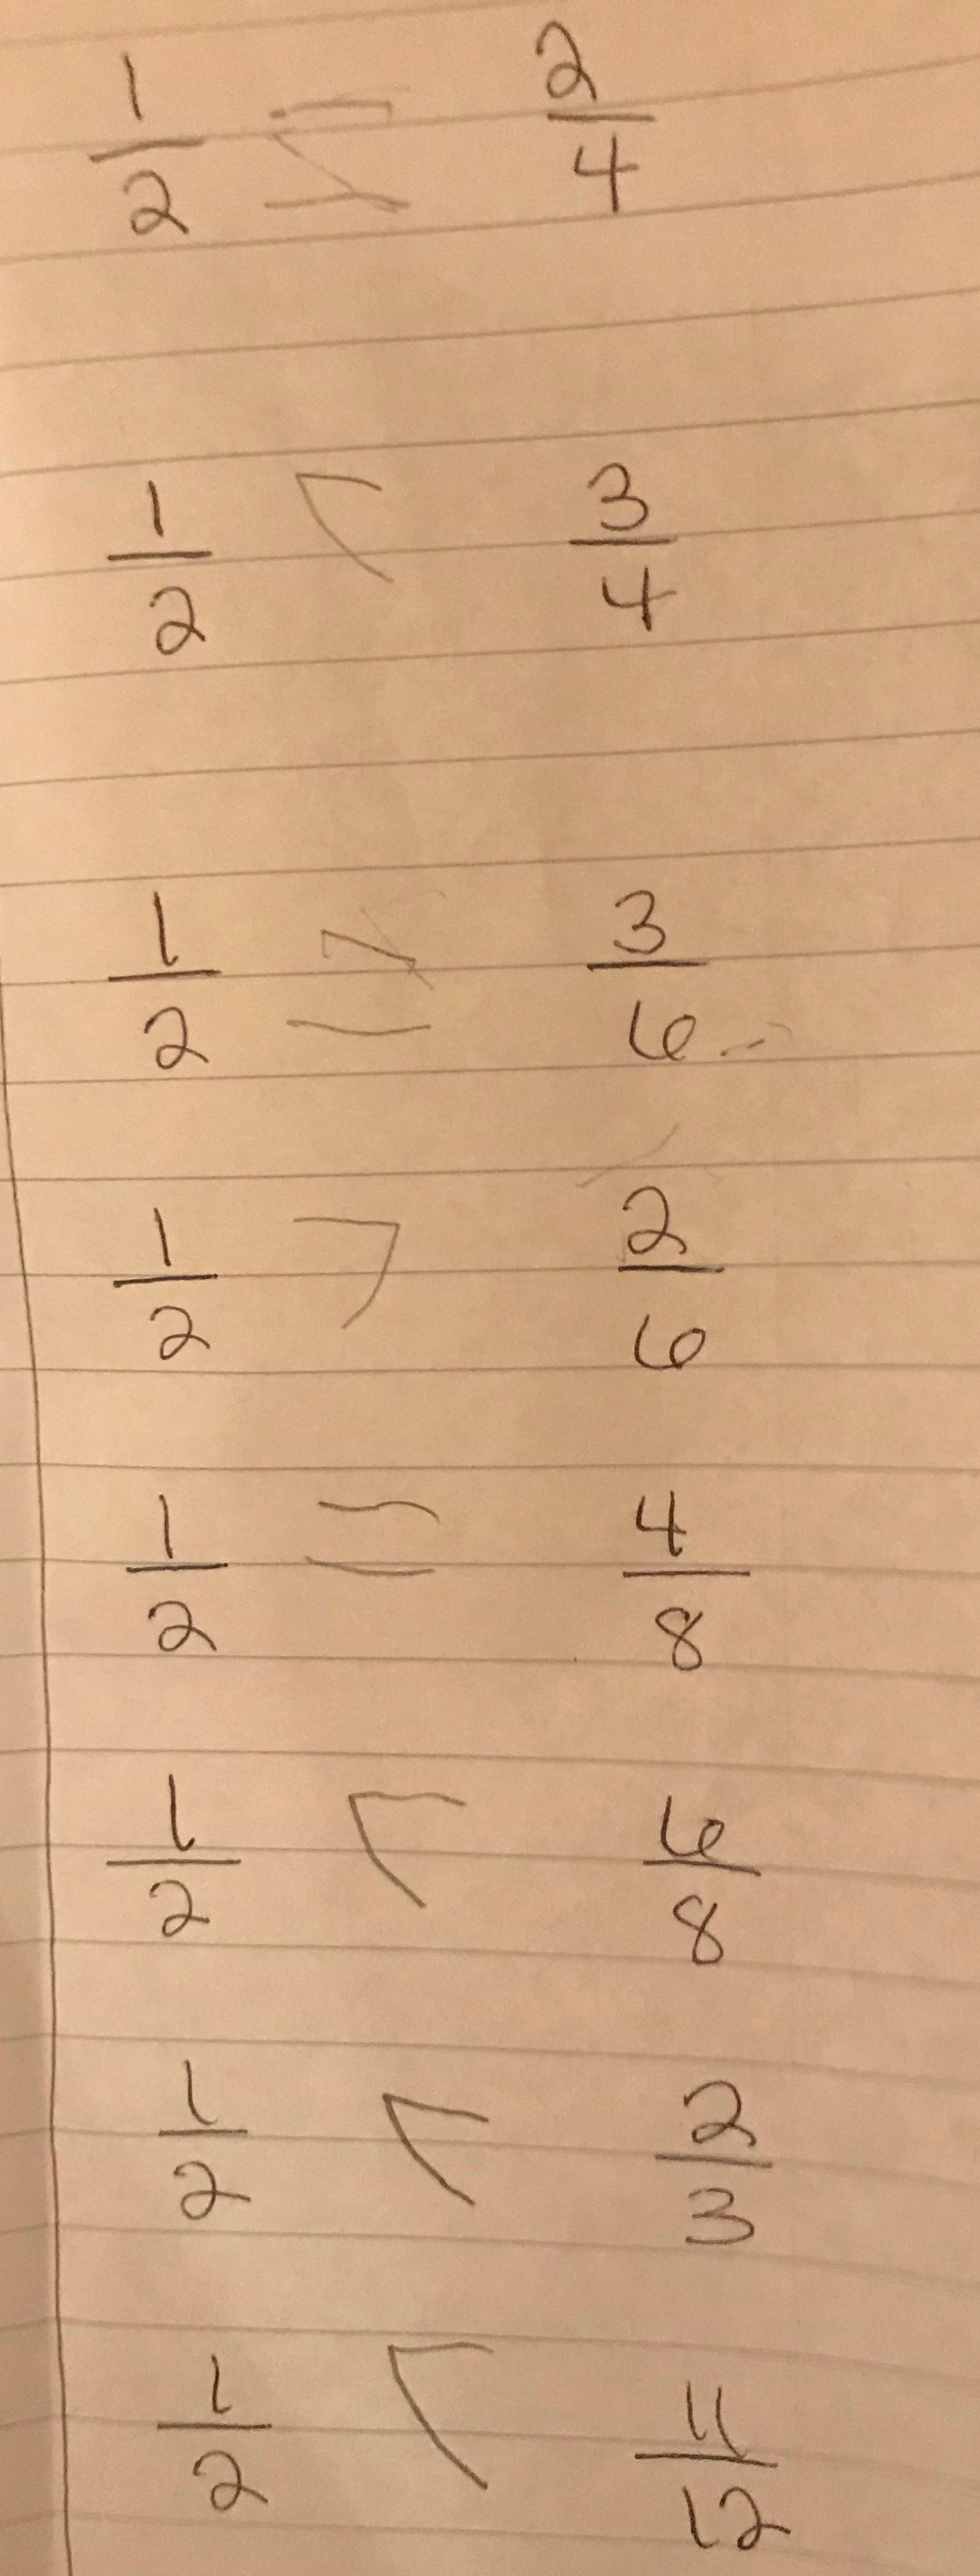
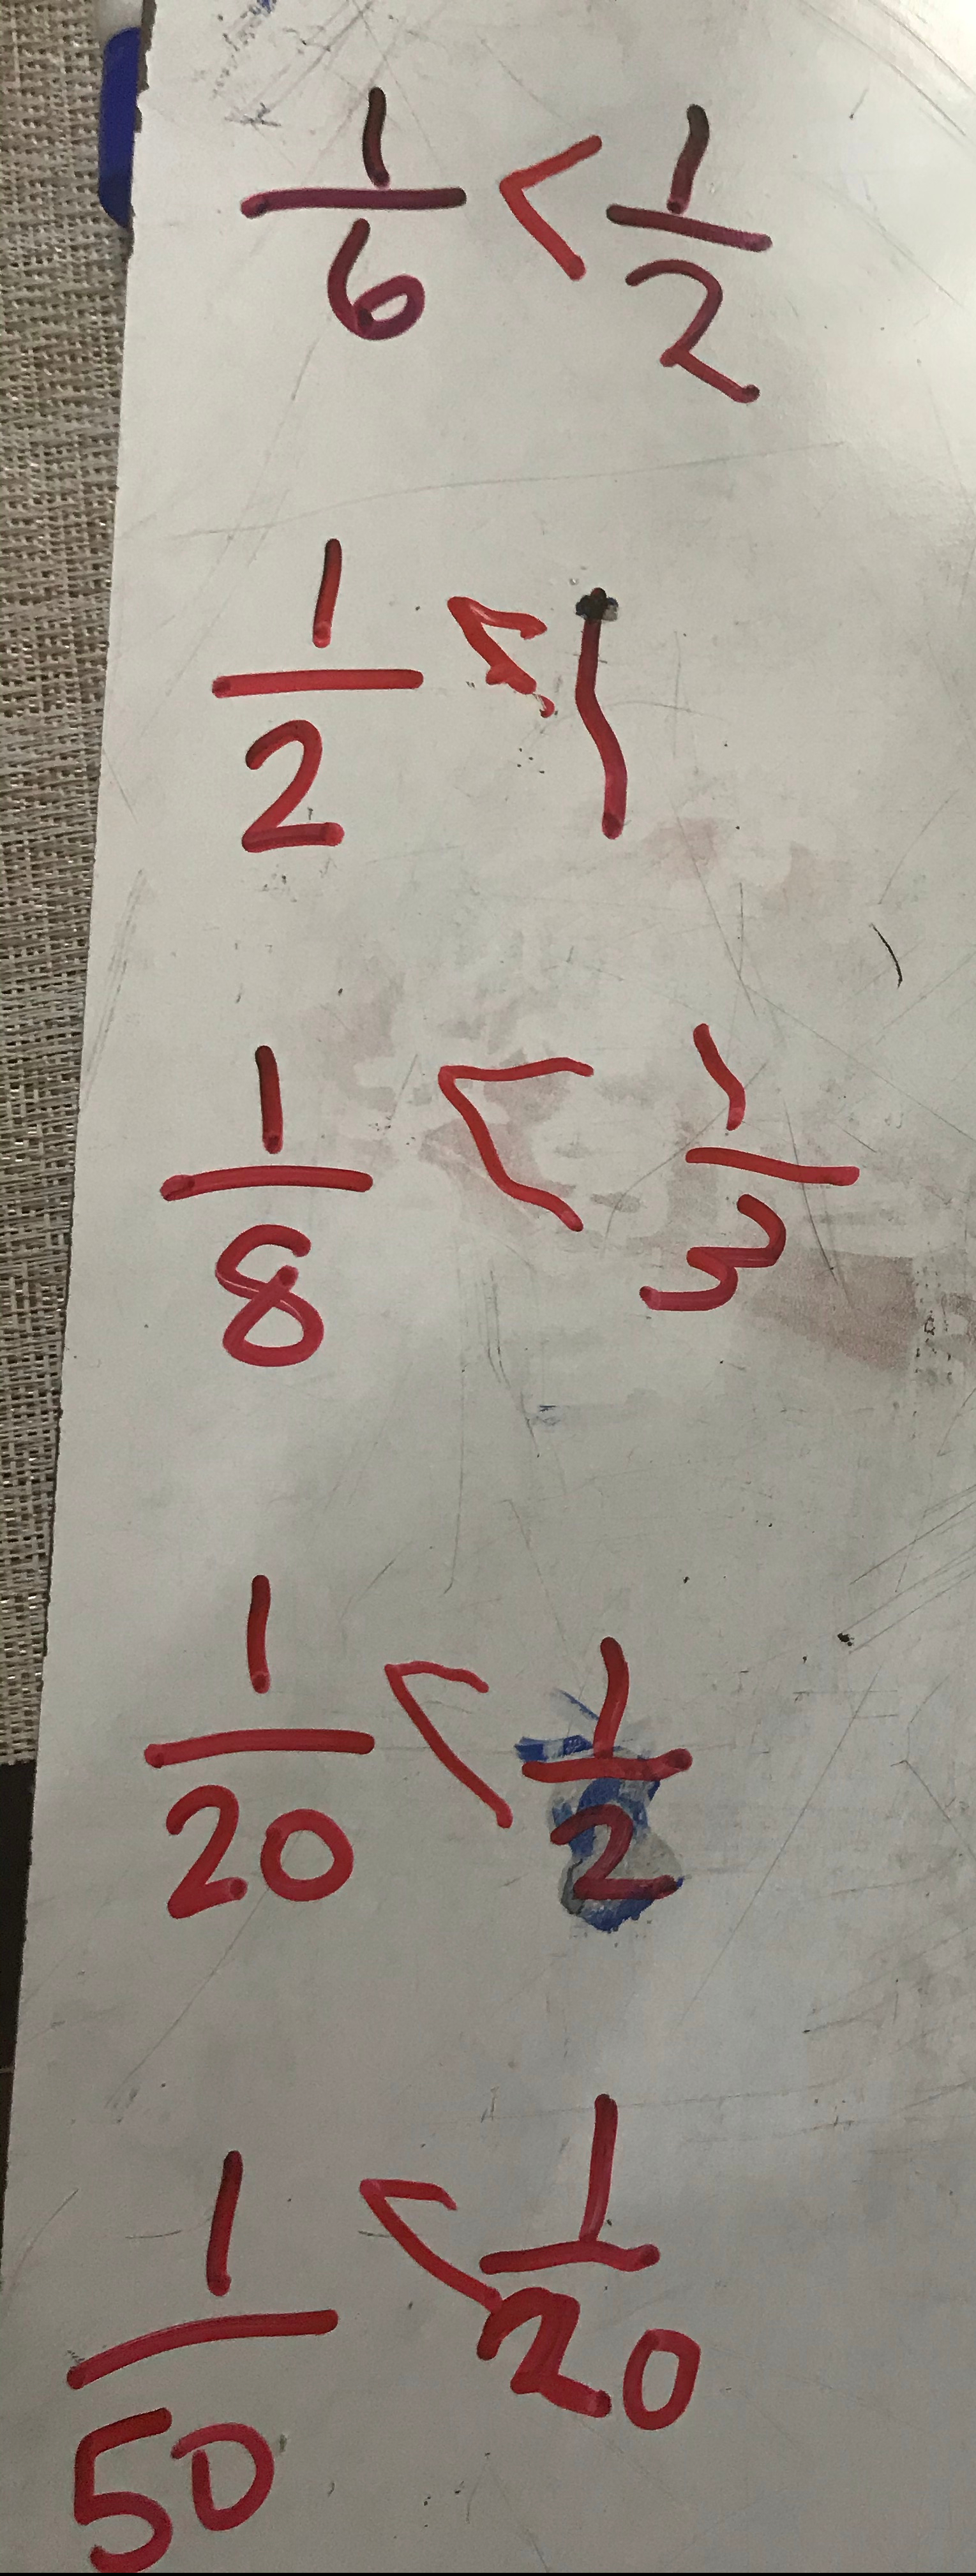
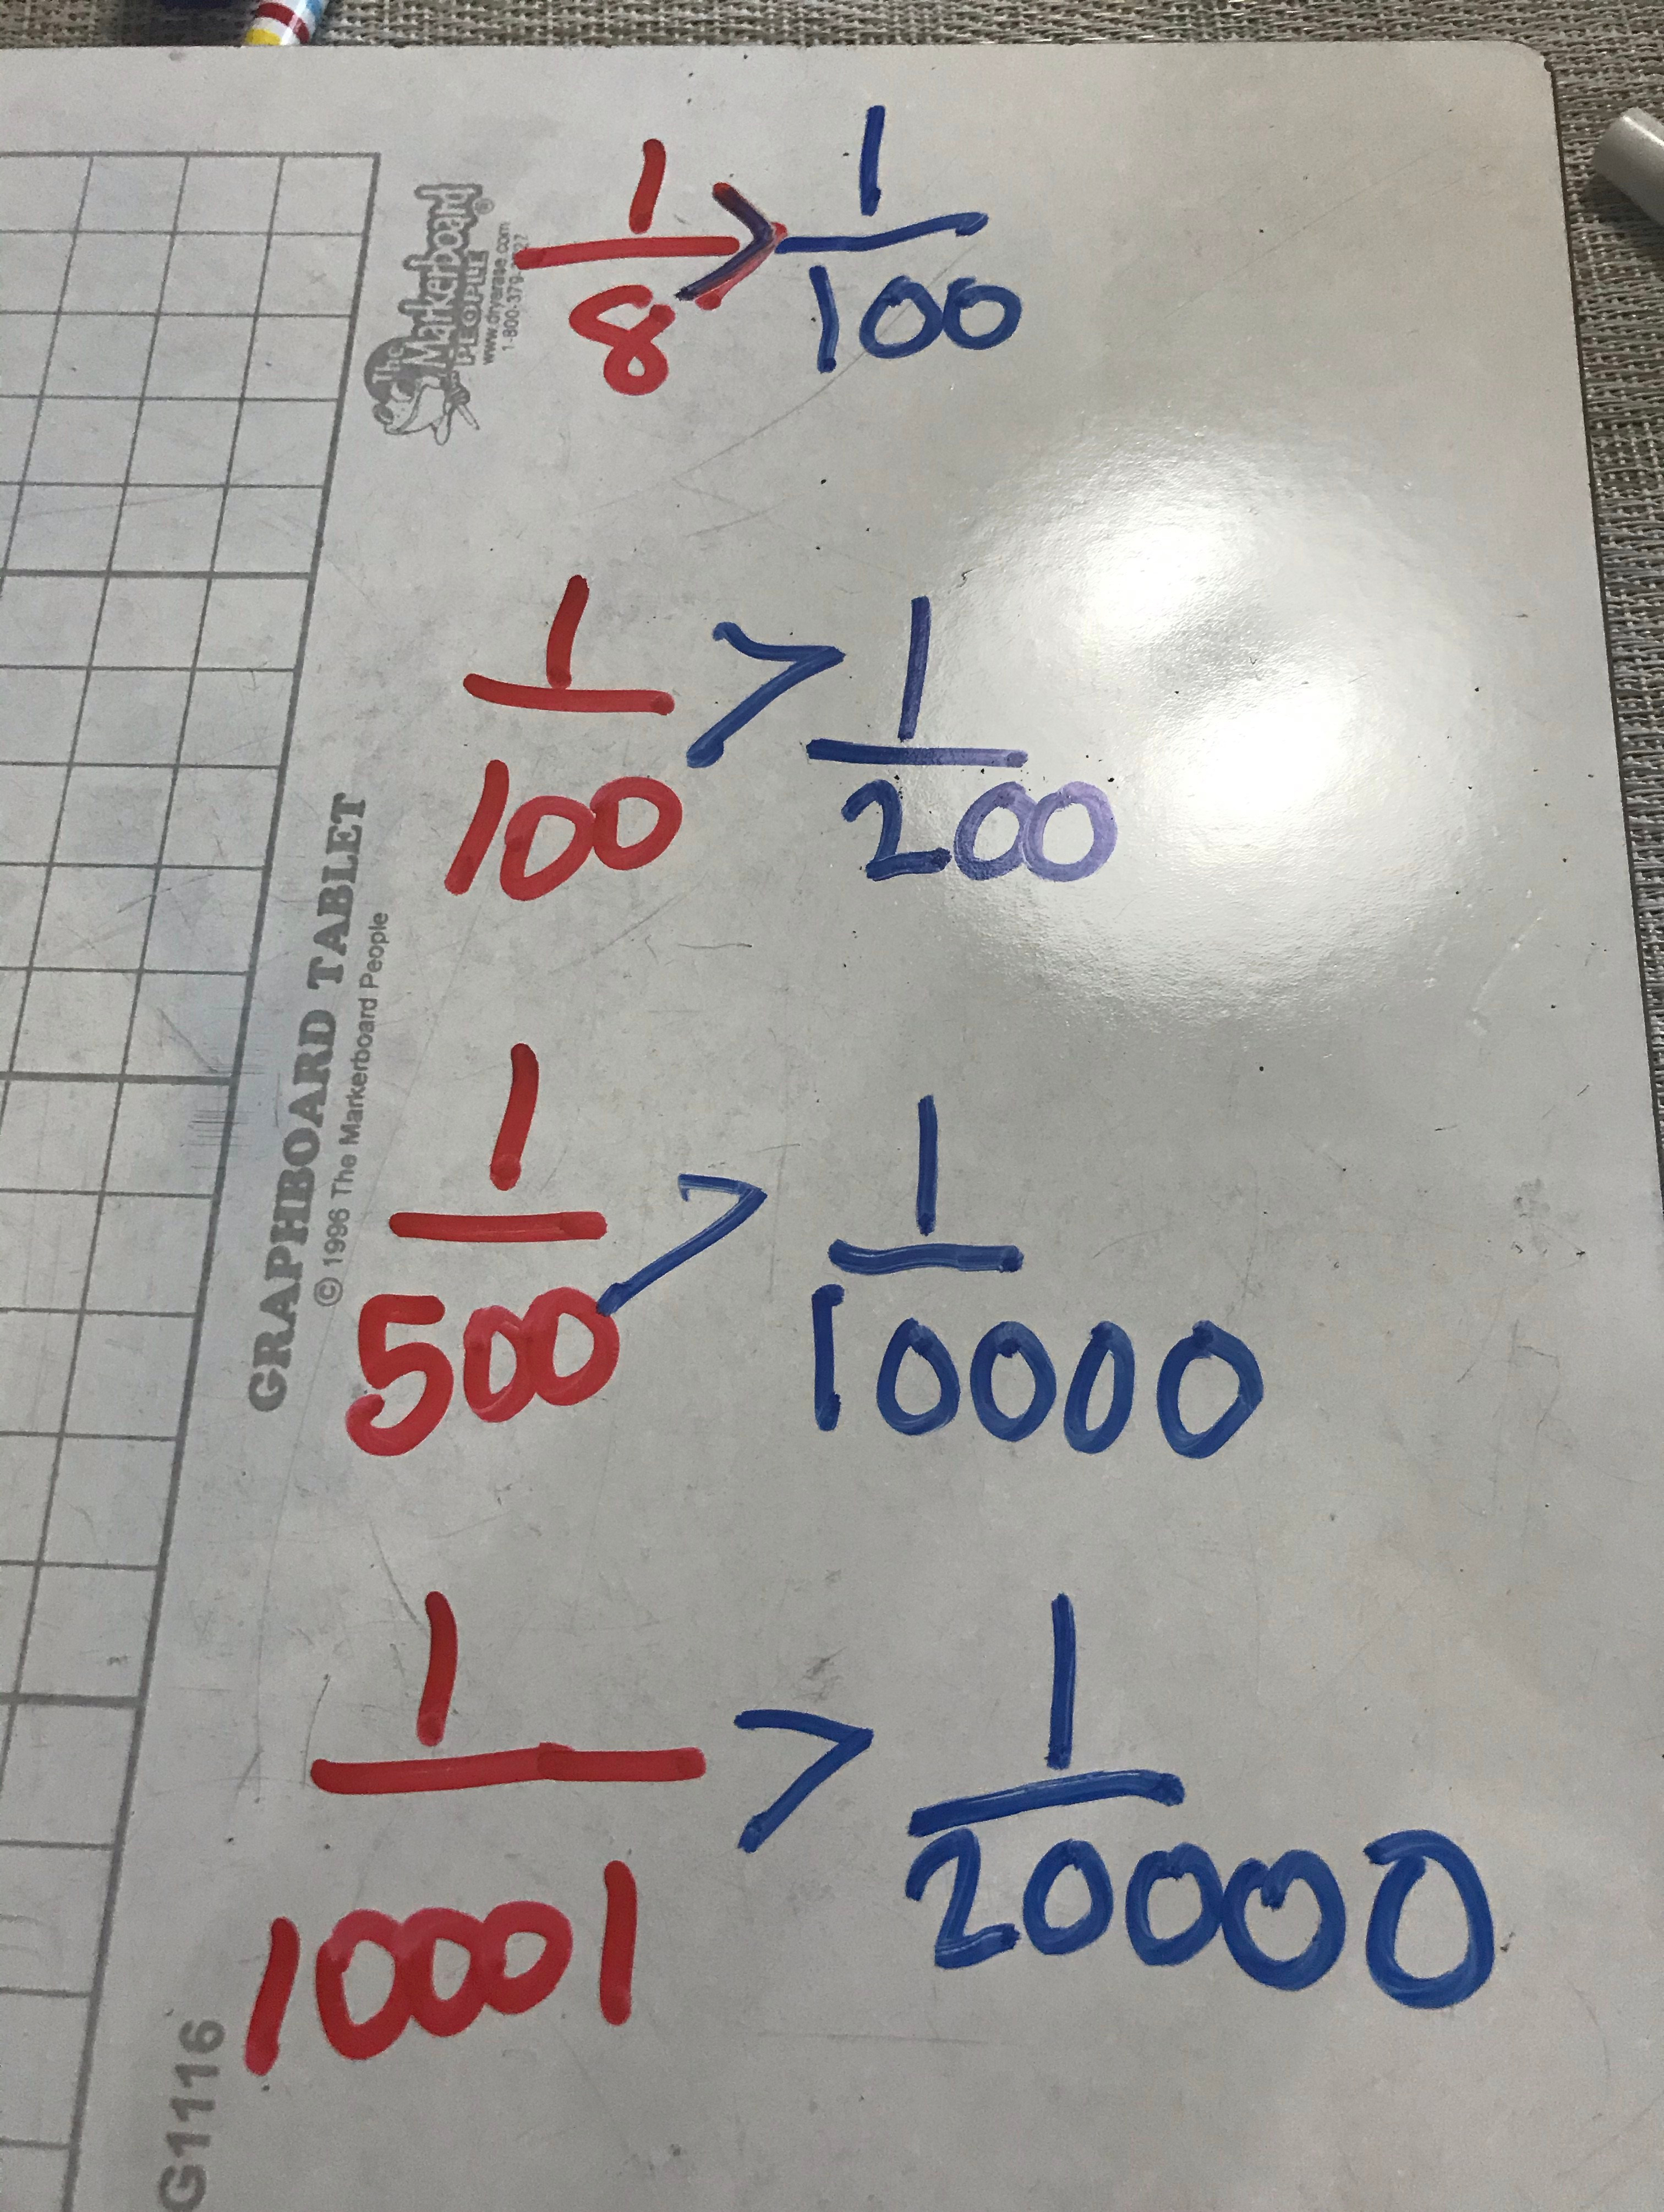
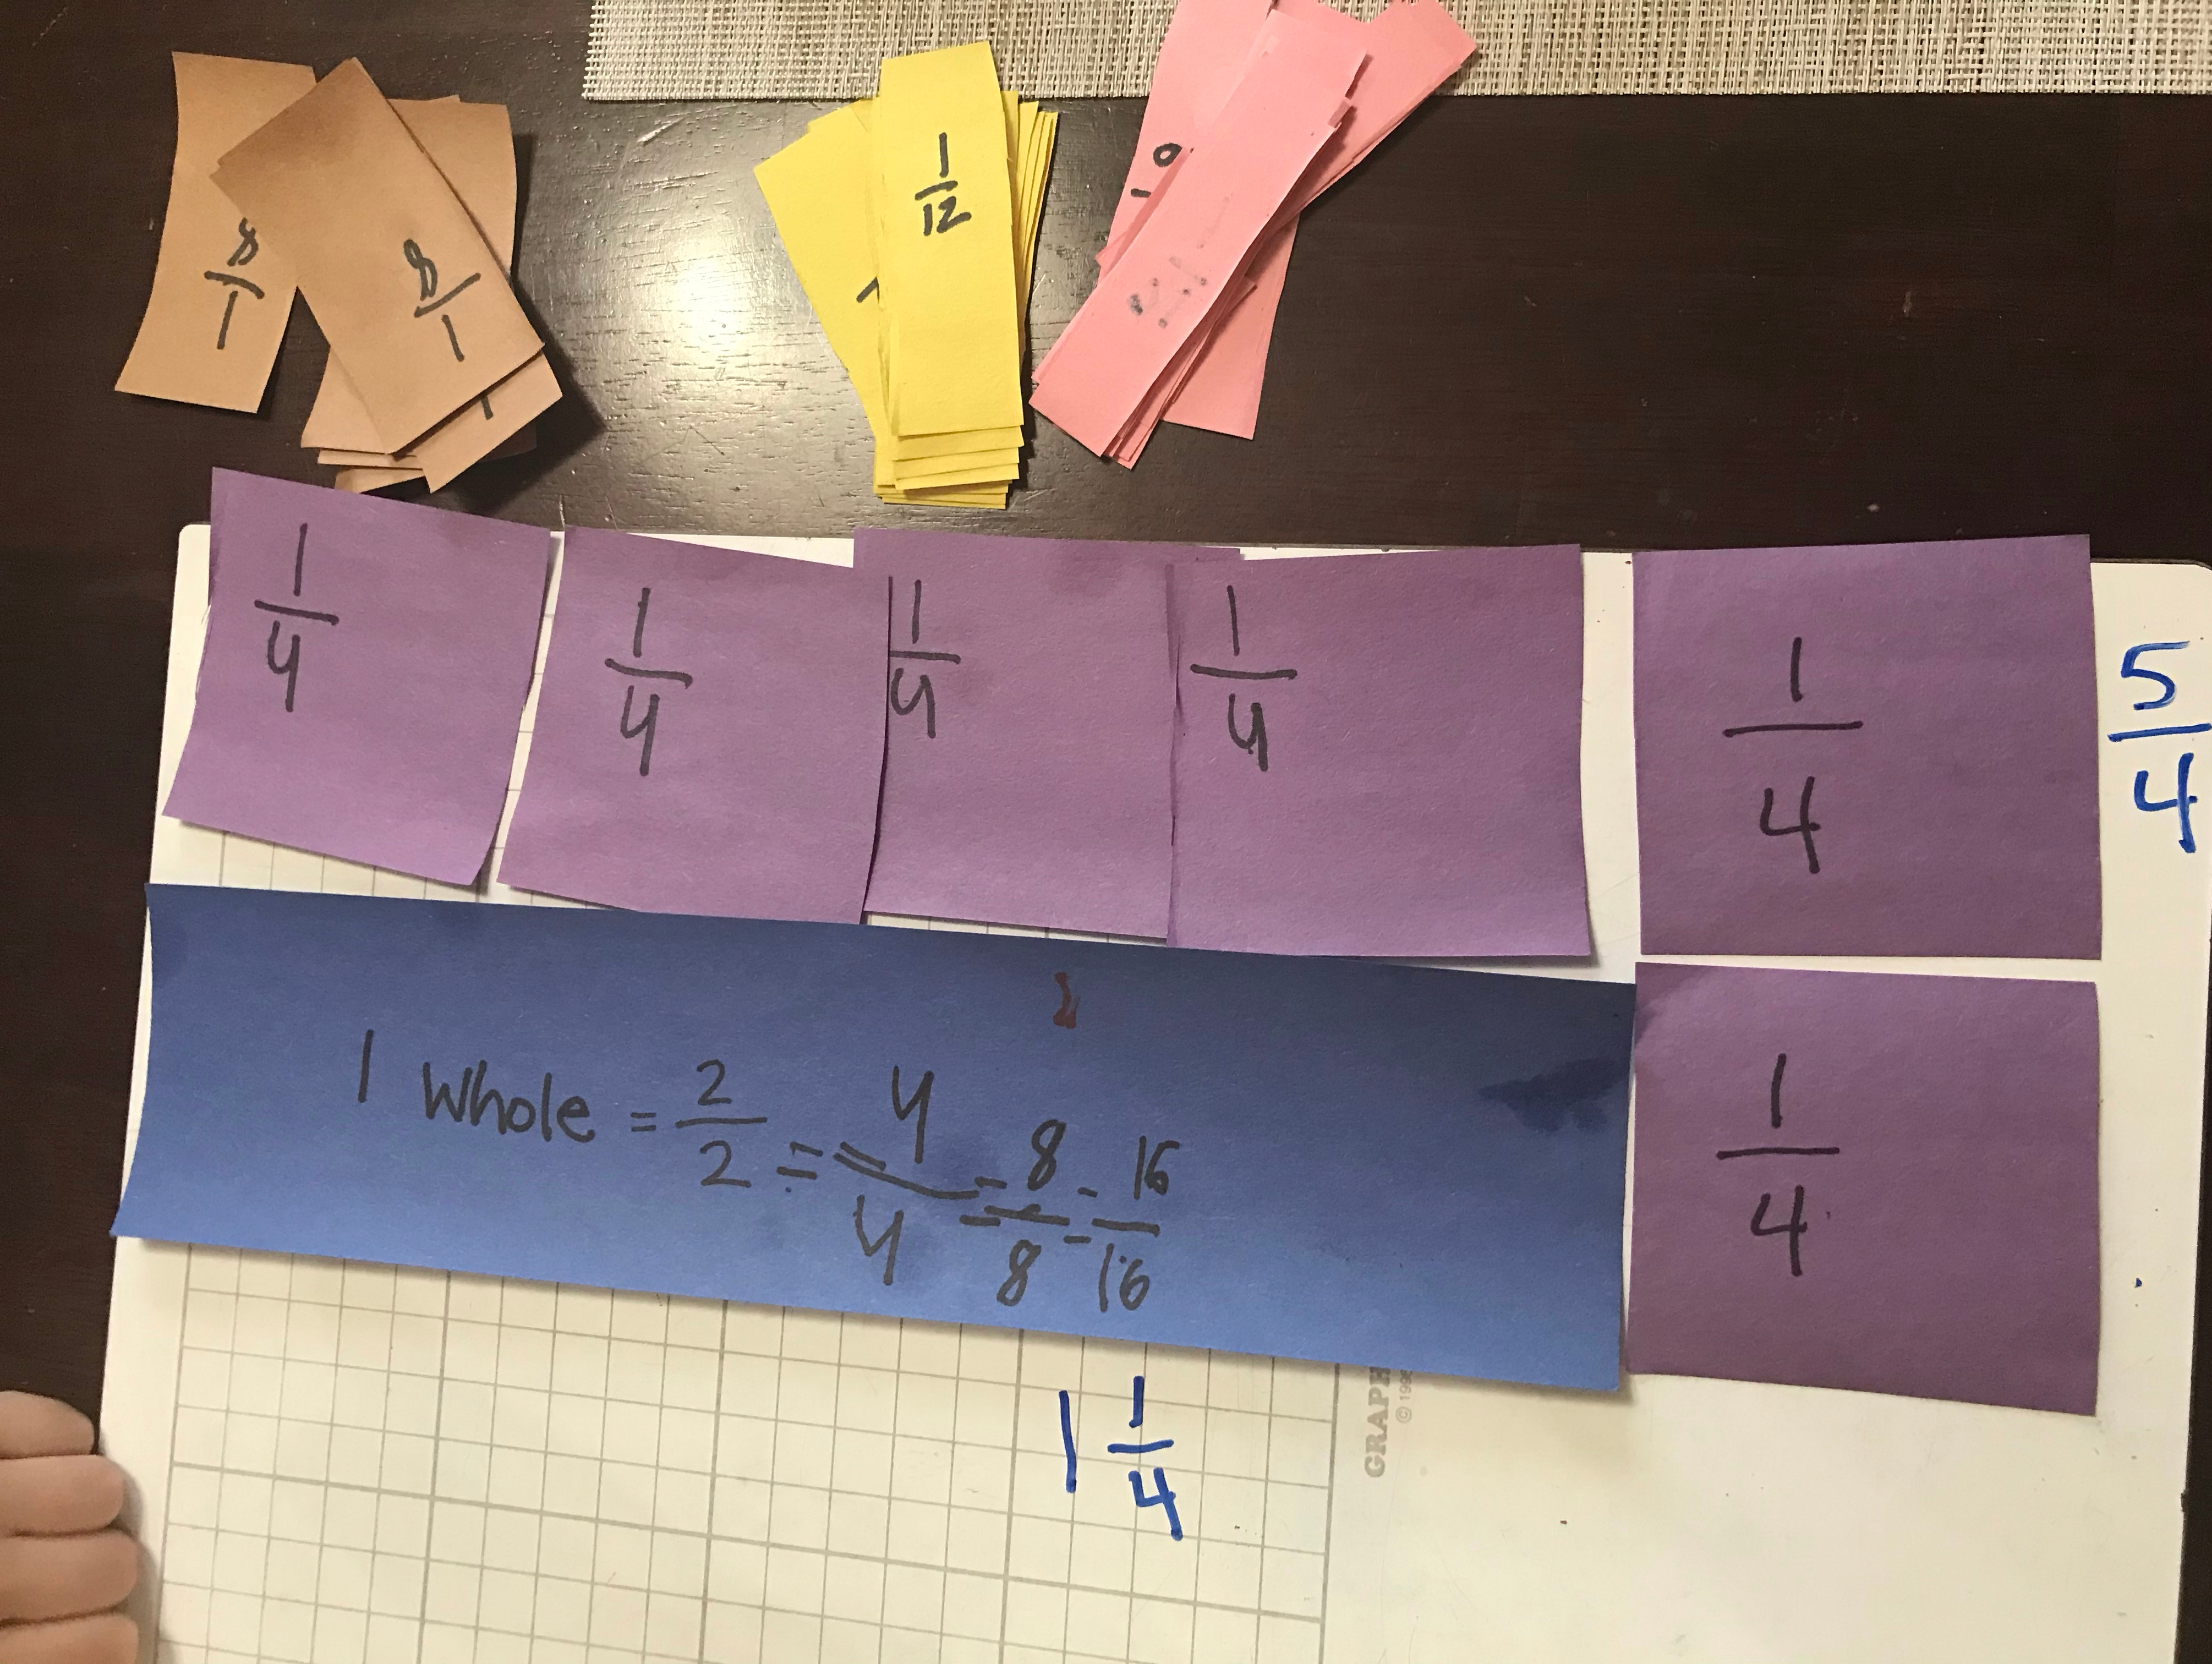
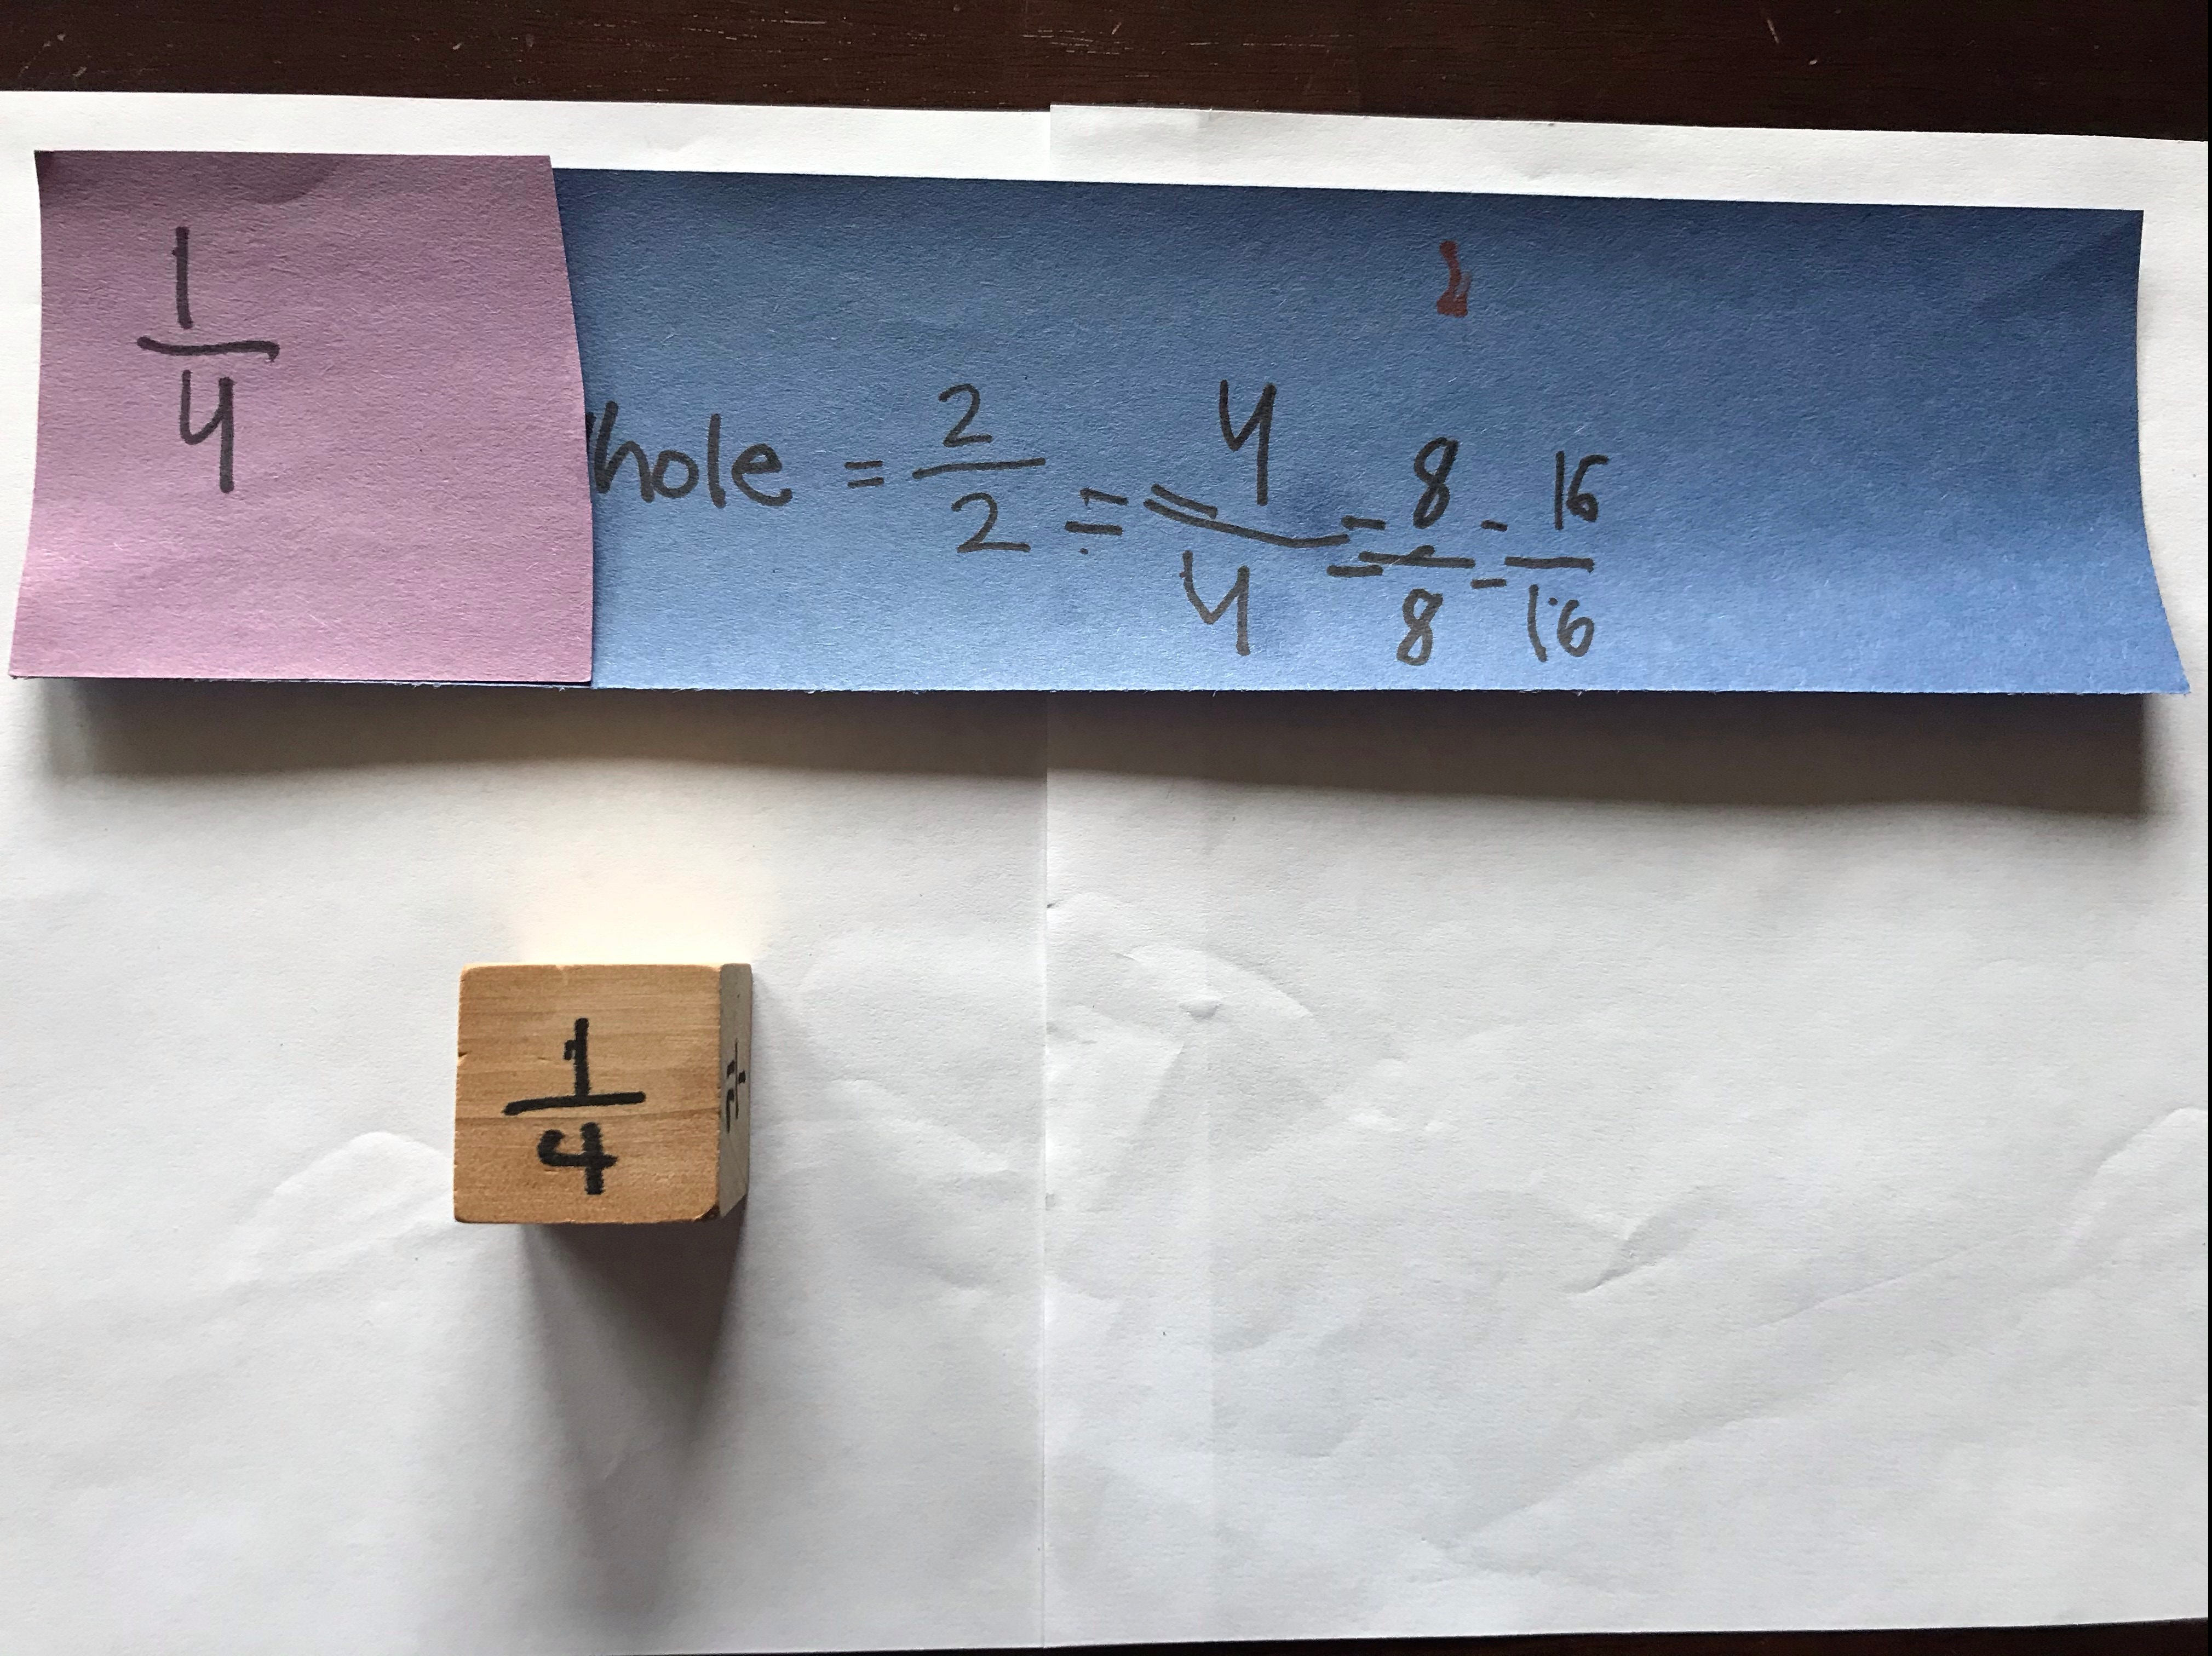
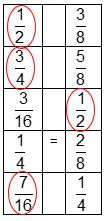
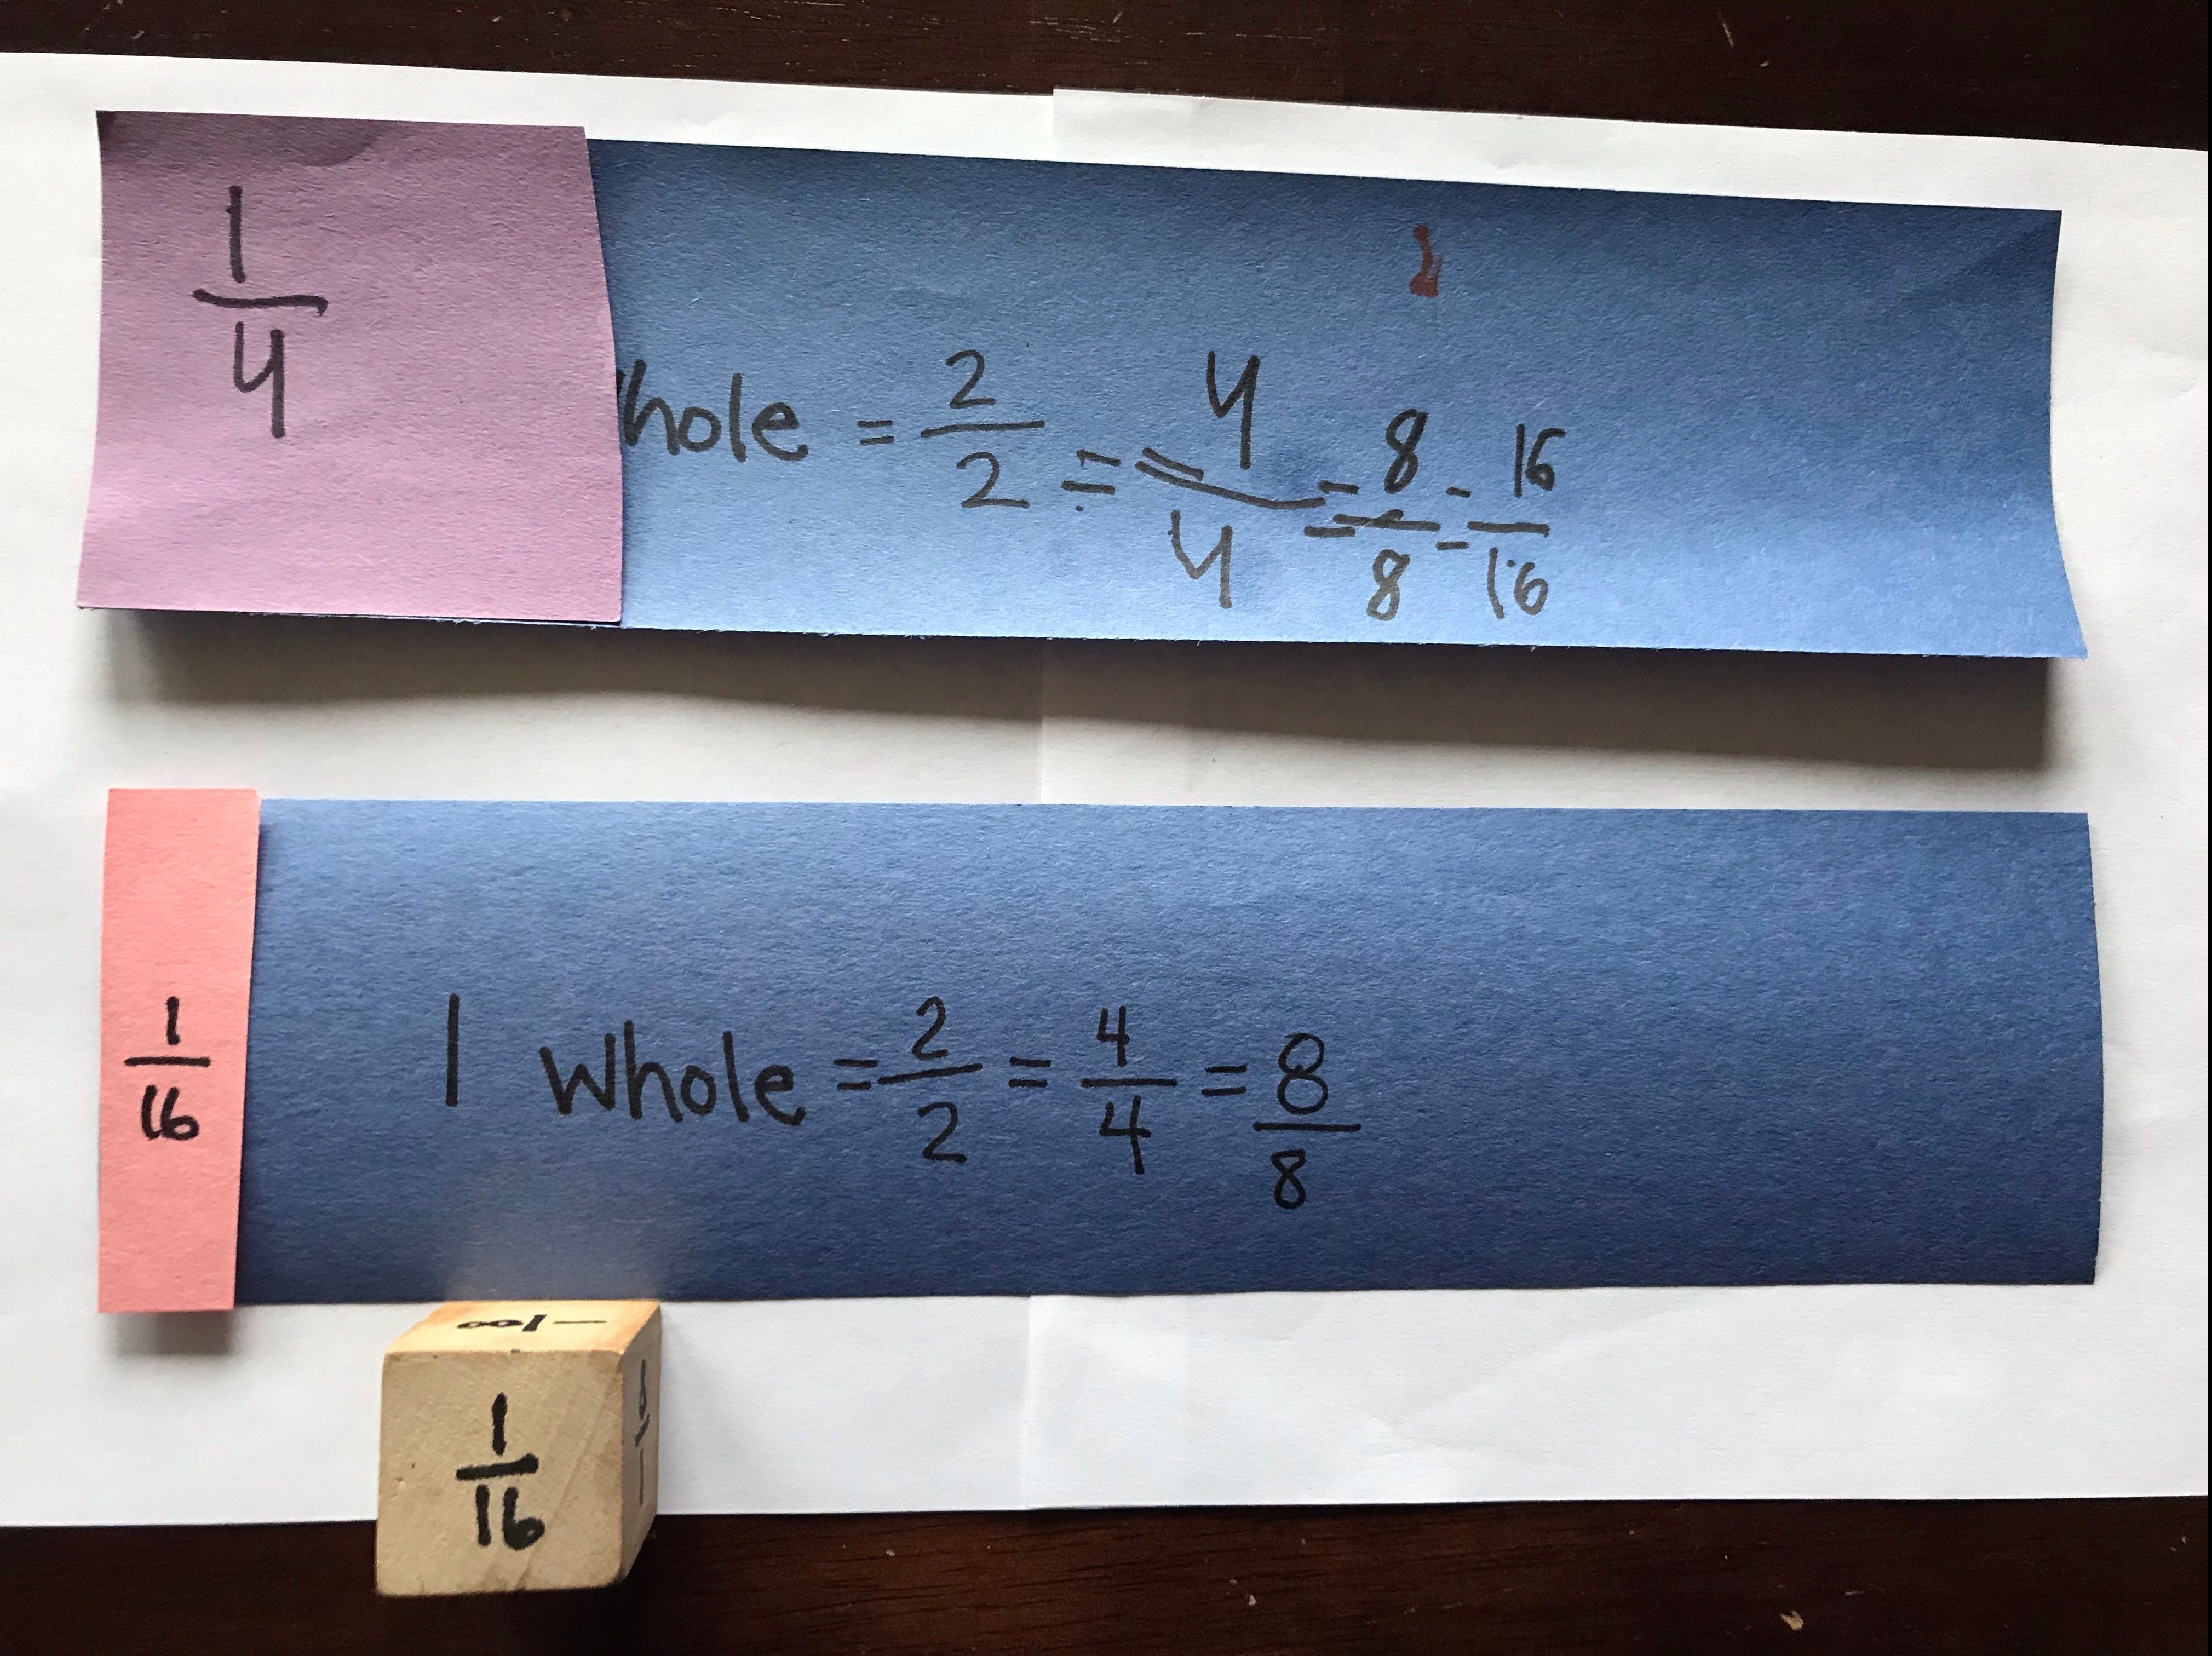
Who has covered up more of their 1 whole? (In our game, Chris had.) How do you know? (Chris originally said, “Because purple is bigger than pink.” I restated, “Oh, so you mean 1/4 is bigger than 1/16?” This helps them start visualizing the size of pieces and prepare for comparing.)
  5. Player 1 rolls the die again and puts that fraction piece right next to the first one so they are touching, but there are no gaps or overlaps (as best as they can). Player 2 does the same on his/her board. Who has covered up more? Who has covered up less? If the two rolls were the same (e.g. I rolled two of the 1/16) How many sixteenths do I have? (2/16).
  6. Play continues until a player covers exactly 1 whole. If a player rolls a fraction that is too big to fit, he/she loses that turn.  Some questions to ask (as appropriate):
    1. Who has more? How much more? (They can use their pieces to figure it out. No actual arithmetic!!!)
    2. Who has less? How much less?
    3. Do you need more or less than 1/2 to win the game? How do you know?
    4. How much more do you need to win (get to 1 whole)?
  7. Once a player has won, have him/her write the number sentence for his/her board.
  8. Repeat the game 2 more times. Best out of 3 is the winner.

So the first two games went fine. Then the third game I was left with this:

Need 1/24 to win!

Needless to say I lost, since I did not have the opportunity to roll 1/24! Chris thought this was great, since he then won 2 out of the 3 games. Next time, I am going to allow the player to remove a piece of his/her choice in exchange for a roll. THEN they may roll the turn after to continue playing the game. This sets us up for the Uncover It! game coming up in a few lessons…

Hope these lessons are going well for you! We love our fraction time and look forward to it daily!

Fractions Day 9: Cover it Up! Game 2

Fractions Day 8: Thirds, Sixths and Twelfths! (Oh My!)

Now that Chris is comfy with the denominators 2, 4, 8, and 16 (and halving/doubling to make equivalent pieces) we tried denominators of 3, 6 and 12. Why 12? I just figured it was easier to work with 2, 4, 3, and 6 once we move to equivalent fractions. Also, it was easier to fold (no joke).

Note: I would suggest you fold for your kiddo. Or have a set already folded for them in case they need it. I did not, and then had to spend time cutting more pieces to make new folds (He laughed…I did not.)

  1. Show the 1 whole again. Explain we are making new fraction pieces for our kit (YAY!).
  2. Let your child choose a color (Chris chose green). Fold into thirds. I cheated and measured it out, then divided by 3 and made marks with a ruler. He then folded on the marks. How many equal sized pieces do we have? (3) What do we call each piece? (1-third). Write 1/3 on each piece and cut them out. Count them out as you cover 1-whole strip: 1-third, 2-thirds, 3-thirds or 1 whole. You can write 3/3 on the whole strip if you would like.
  3. Have your child choose a different color (Chris chose orange.) For the sixths, fold again into thirds, then in half. How many equal-sized pieces do you think we have? (5???) Open it up and see. (Oh-6! Well yeah, because 3 doubled is 6.) What do we name each of these pieces? (1/6) Write 1/6 on each piece and cut them out. Again, name the amount as you cover up the 1 whole strip with 1/6 pieces. 1-sixth, 2-sixths, 3-sixths, …, 6-sixths or 1 whole.
  4. Take one final color and fold into thirds, fold in half once, then fold in half a second time. How many equal-sized pieces do you think we have? (I don’t know…ummmm…10?) He opened it up and saw 12 pieces. What is the name of each piece? 1/12. Write 1/12 on each, cut them out, and count them as you cover the 1 whole.
  5. I asked Chris to show me different values.
    1. Show me 3/12.
    2. Show me 5/6.
    3. Show me 2/3. (I soo wanted to start comparing, but that is not the focus for today. Keep it focused so they get what you want out of the lesson.)
    4. Show me 7/6. (HA!) He just grabbed one of my pieces to make 7/6.
    5. Show me 5/3. Same. Grabbed my pieces to figure it out.
    6. If you can’t grab my pieces, how could you show 5/3 with your pieces? I wish I had taped it. I thought he would show 1 whole and 2/3. But no. He used the 3/3 then 4/6! I love when we let them do their own thing. They always seem to surprise us!
Fractions Day 8: Thirds, Sixths and Twelfths! (Oh My!)

Fractions Day 7: Cooking with 1/4

Today was our first day of Distance Learning from our school. Though I am grateful for all of the lessons now being planned out and having some awesome challenges to engage in (Shout Out to Coach SMITH and Mrs. NEAL!!!!), it messed up the routine we had been rolling with. I spent so much time navigating the different sites and trouble shooting that I didn’t have time to prep the new colored strips I needed to start thirds, sixths and ninths for the Fraction Kit.

I honestly thought Chris wouldn’t ask about the math, as he had so much to do for his other classes. (I was ready to ditch out on the fractions today.) But he asked at lunch, When are we having our fraction time, Mom? How can you say no to that?!!! (Well, okay lots of us can, but anyone who knows me knows I can’t. Ask my good friend who had to wait for me to write on receipt paper math tutorial links for the cashier at Total Wine the other day!)

Fortunately, a good friend had posted on Facebook a recipe for making salt-dough ornaments. See below for the recipe, but what I loved about it was there are only 3 ingredients (And I had them all!!!!) and the amounts were cups and halves. Perfect!

Naming the Measuring Cups
  1. I pulled out all of my measuring cups and asked Chris how he would name them. He called the full circle 1 whole. He took the others and rotated them within the cup to figure out how many fit inside. Pretty similar to the Fraction Kit, but with circles. We named them verbally and I asked him to find the fourth. We put the rest away.
  2. I asked him to measure 1 cup of flour with the 1/4. How many fourths would you need to make a whole cup? 4 How do you know? Because it takes four of them to make a fourth. (He rotated the 1/4 in the air to show the whole circle.) 1-fourth, 2-fourths, 3-fourths, one-whole.
  3. We needed to measure 1/2 cup of salt. How can you use the 1-fourth to find 1-half? Well, since 4 of them made a whole, I need only 2.
  4. We needed to measure 1/2 cup of water. I didn’t bother asking; I knew he got the gist of it.
Measuring Out 4-Fourths (1 Cup)

The recipe is super easy to make and fun to create different ornaments to paint and share with friends during this isolation time. I am having Chris write a letter with each to send out next week so we can get some Pen-Pal action going!

May the Force Be With Us ALL!!!!

Note: We did not put parchment paper down the first time we rolled out the dough and it was a huge mistake! Place parchment or wax paper down and sprinkle some flour before rolling out the dough.

Fractions Day 7: Cooking with 1/4

Fractions Day 6: The Return of Equivalent Fractions

Good morning! We needed more time with equivalent fractions and doubling/halving ideas before moving on to the family of thirds. Note: In two lessons, we will be making 3 more sets of colored fraction sets for our Fraction Kit. You will need 3 strips of equal size to the others in different colors.

There is no shame is repeating lessons. We do not master something in 15-20 min, and certainly not a new idea/concept. So this is going to sound a lot like Lesson 5. Trust me, it is helpful for later on!!! (And you really don’t have to prep anything new! BONUS!!!)

Trying to “Trick” his Mother!!! Commutative Property in Action!
  1. Play “Cover it Up!” twice. Please see Fractions Day 2 for how to play the game. We again focused on equivalence. How much more would I need to have the same amount as you? How much more would you need to be the same as me? How much more would we need to win? As always, I have Chris write his addition sentence once he covers the whole.
  2. We revisited the half and made equivalent fractions using only same-size pieces. See Fractions Day 4 for the lesson (the picture is above).
  3. Keeping with the half strip, I asked him to show 2 different ways to make a half without using ALLLLL of the same size pieces. I had to adapt and ask for 3 ways (As you will see why in the video above!). This was important to do, as it allowed him to really think about which pieces were equivalent and how to fill in the space to make half.
  4. My ink was out (and waiting for my Office Depot shipment!!!) so I hand wrote the fractions I wanted him to explore. See the picture below for the fractions and sequence we explored. This went much faster than I anticipated! I was especially excited to hear him stating things like, Well 2-eights is the same as 1-fourth or, If 2-sixteenths is an eighth then count by 2’s to get to 3-eighths. 2, 4, 6. So 6-sixtenths is the same as 3-eighths. I love making him tell me his thinking. It helps him learn how to explain and it helps me know what to do the next day!
Equivalent Fractions Work with Fraction Kit

Coming Next: Fractions and Cooking! We used the Visual Measuring Cups (I got mine on Amazon), but you can use whatever you have! We only used the 1-fourth measuring cup.

Fractions Day 6: The Return of Equivalent Fractions