Fractions Day 3: Which is Bigger?

Science and a Birthday gift of slime/putty jars kept us busy and at a very quick math lesson today. ‘Cuz you know…priorities!

  1. Played “Cover it Up!” twice. Please see Fractions Day 2 post for how to play the game. The questions I used were focused on were:  Who had more? or Who is winning? How do you know? to front load for today’s lesson.
  2. Using a whiteboard (or scratch paper), I drew the equal symbol (=). What does this mean? (Chris said it meant they were the same size, which I was fine with.) Show me which pieces would be equal. He showed the 1 whole and 2/2. I then wrote 1=2/2.
  3. Under that work, I drew the greater than symbol (>). What does this symbol mean? (Chris said it was an alligator. More on that another blog. I am not in the mood for that one!) We discussed that it meant the first number you write must be bigger than the second number. The math vocab wasn’t very sophisticated, as I just want him understanding the idea. I had him choose two fraction pieces from the Fraction Kit to compare, with the first being bigger than the second. We then wrote the number sentence that it represented.
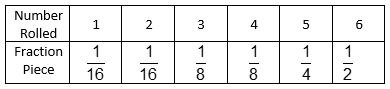
  4. I had Chris compare pairs of the unit frunit fraction compare
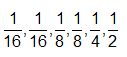
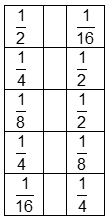
actions from the Fraction Kit and tell me which one was greater and why.  See the unit fractions to the right for sequence of the pairs we explored.
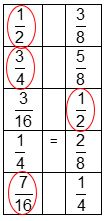
  5. Once he had the idea of comparing we moved on to fractions with different numerators (still only using the denominators from the Fraction Kit). I gave him (one at a time) pairs of fractions to compare. He could use the Fraction Kit pieces to determine which was greater, circling it on the whiteboard. I asked him to convince me why one fraction was larger than the other, and he verbally explained or showed me with his fraction pieces. See below for the sequence of pairs we explored (The circled ones are the greater fractions.).comparing fractionsI often asked, How many more of ____ would you need to make them equal?, just to start the seed of equivalent fractions (Day 5). Then I threw a pair of equivalent fractions in our set to see what he would do. (He rolled his eyes and said they were equal. Duh, Mom!)


Overall, Chris did well with circling which fraction was bigger, so long as he could use the pieces to work through the pairs. This is appropriate, as he hasn’t learned any other strategies for comparing. We will move to which fraction is smaller tomorrow to continue comparing sizes of fractions and really understanding what the numerator and denominator mean with respect to the Fraction Kit pieces.

Fractions Day 3: Which is Bigger?

Fractions Day 2: Cover It Up!

Good morning! So I thought I would get this to you prior to Monday in case you have to search for materials to play the game. I love this game! It is easy to play, yet emphasizes so many important fraction ideas that might go missing in a regular math book. We played 3 times and called it quits, because I knew we would continue to play it every day for the entire week and I didn’t want him to tire of it.

Cover It Up!

Materials: The Fraction Kit (See Fractions Day 1 for how to make the Fraction Kit), one kit per person, sharpie, and ideally a blank wooden cube. (See below for alternatives for a cube.) We also used a whiteboard and dry erase pen, but those are totally optional.

How To Play:

  1. Using the sharpie, label the 6 faces (one fraction on each face) of the cube as follows. See below for other options if you do not have a blank cube.dice
  2. Place the 1 whole fraction strip in front of each player. This is your “game board”.
  3. Player 1 rolls the die, and puts that fraction piece on his/her 1 whole to the far left.img_1676
  4. Player 2 rolls the die, and puts that fraction piece on his/her 1 whole to the far left.img_1677 
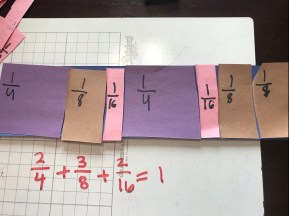
Who has covered up more of their 1 whole? (In our game, Chris had.) How do you know? (Chris originally said, “Because purple is bigger than pink.” I restated, “Oh, so you mean 1/4 is bigger than 1/16?” This helps them start visualizing the size of pieces and prepare for comparing.)
  5. Player 1 rolls the die again and puts that fraction piece right next to the first one so they are touching, but there are no gaps or overlaps (as best as they can). Player 2 does the same on his/her board. Who has covered up more? Who has covered up less? If the two rolls were the same (e.g. I rolled two of the 1/16) How many sixteenths do I have? (2/16).
  6. Play continues until a player covers exactly 1 whole. If a player rolls a fraction that is too big to fit, he/she loses that turn.  Some questions to ask (as appropriate):
    1. Who has more? How much more? (They can use their pieces to figure it out. No actual arithmetic!!!)
    2. Who has less? How much less?
    3. Do you need more or less than 1/2 to win the game? How do you know?
    4. How much more do you need to win (get to 1 whole)?
  7. Once a player has won, have him/her write the number sentence for his/her board. (We totally cheat and I let Chris roll as many times until his board was filled as well.)img_1620
  8. Repeat the game 2 more times. Best out of 3 is the winner.

Alternatives to a Blank Number Cube: If you don’t have a blank wooden cube, below are some options so that you can still play the game. I have done all of these and they are all great options.

  • Make your own die: See below for blank template and write the fractions we used on #1. Note: This is better printed on card stock or heavy paper.
  • Make a spinner. See the PDF below and use Spinner #3. Label the sections as we did the cube above in #1. Using a paper clip and a pencil, place the pencil in the paper clip in the center of the spinner and spin the paper clip. Where it lands is your fraction. This can be on plain paper and it works great.
  • Roll a regular die. See below for the fraction you get for each number on the die. table

For link to die template: https://www.printableboardgames.net/preview/Blank_Die

For link to Spinner Templates:Templates-for-Spinners


Fractions Day 2: Cover It Up!

Taking The Distributive Property to Middle School: Making Multiplying Mixed Numbers Easier!

The last couple of blogs have highlighted the importance of the distributive property in multiplication for grades 3-8.  Let’s refresh ourselves…

Example: 6 x 9    Try it out using the distributive property! (There are many, but I have highlighted two.)

Method 1: Think about the 9 as (10 – 1).  Distribute (multiply everything in the parenthesis by) the 6.

 6 x (10 – 1) = (6 x 10) – (6 x 1) = 60 – 6 = 54

Method 2: Think about 9 as (4 + 5). Distribute the 6.

6 x (4 + 5) = (6 x 4) + (6 x 5) = 24 + 30 = 54

So you may think, “Jen, where the heck are you going with this?! This is a waste of my time and my child’s time.” Yet here was my son’s homework earlier this year.

multiplying mixed number

He was to multiply 17 2/5 by 5. Most of us learned you MUST convert the mixed number (17 2/5) to an improper fraction, then “multiply tops/multiply bottoms”. Finally change the improper fraction BACK TO A MIXED NUMBER. What a stinkin’ waste of time!

My oldest had the problem done in less than a minute. He got 87. Do you see it? What did he do? I have to admit I didn’t see it at first, and had to ask him. This is what he said (please insert a very monotone voice, since he wasn’t pleased with having to tell his mother his strategy…)

I thought about the 17 2/5 as two parts. 17 + 2/5. I mutliplied 5 times 17 and then 5 times the 2/5. Then I put it back together. (Duh, mom.)

So what does this look like mathematically?

5 x 17 2/5 = 5 x (17 + 2/5)

                                                 5 x (17 + 2/5) = (5 x 17) + (5 x 2/5) = 85 + 10/5 = 85 + 2 = 87.

In this case, using the distributive property is MUCH faster than the rules we were taught! And it makes sense! I am using partial products. I break up my number into easier parts, multiply them by the given value, and put it back together.

Here is another example. This came from one of my intervention students (students who are brilliant but don’t excel with the traditional book method in mathematics…) :

Import 9.3.14 709

You can admire all of his fabulousness, but the piece I want to focus on is 9 1/11 x 7. In red, notice he rewrote it for everyone to understand. Please note he had done it in his head (the blue). All red work was written after to let his class know what he was thinking.

                                  9 1/11 x 7 = 7 x 9 1/11 (commutative property)

7 x 9 1/11 = 7 x (9 + 1/11)

                                     7 x (9 + 1/11) = (7 x 9) + (7 x 1/11) (distributive property)

                         = 63 + 7/11 = 63 7/11%

Why am I showing you this? As parents, you WILL see the distributive property used with fractions, decimals, and percents. It makes it faster to compute, as students can do most of it in their heads. Most important, when students use the distribute property, I have noticed less “silly” errors. They get it right because it makes sense!

What can you do to support this kind of thinking? Play with numbers. Use a whiteboard. Use the sidewalk with chalk. Use the bathroom mirror with a dry erase pen. Give one problem a day and see how easy it gets to think about multiplication this way.

Here are some starter problems…

7 x 6, 7 x 7, 7 x 8, 7 x 9, 7 x 12 (break the 12 into 10 and 2)

8 x 4, 8 x 6, 8 x 7, 8 x 9, 8 x 12

9 x 4, 9 x 6, 9 x 7, 9 x 8, 9 x 12

3 x 16 (break into 10 + 6), 3 x 17, 3 x 18, …You could go on forever!

2 x 4 1/2, 2 x 5 1/2, 2 x 6 1/2, ….and so on

3 x 4 1/3, 3 x 4 2/3, 3 x 5 1/3, 3 x 5 2/3, …and so on

4 x 3 1/4, 4 x 3 1/2, 4 x 3 3/4, … and so on

If you need more, just look up free worksheets that multiply a mixed number by a whole number. Use one a day!

Taking The Distributive Property to Middle School: Making Multiplying Mixed Numbers Easier!